

Add Property
Your journey starts by adding your properties.Add Property Manually
Click on Properties → Add PropertyThe following are the Property itemm fields
- Property Name* - Enter the name of you property
- Property Profile Image -Upload a representative image for your property. Supported formats: .png and .jpg. Maximum file size: 3 MB.
- Location Details* - Enter the address of your property
- Property Type* - This is an informational field only and does not affect your property’s management, workflows, or calculations:
- APARTMENT (default)
- HOUSE
- OFFICE
- STORE
- STORAGE
- CONDO
- LAND
- Property Currency - By default, all properties use USD as their primary currency. However, you can assign a different currency to each property individually. The selected currency will be used throughout the property’s lifecycle, including all future transactions, reports, and analytical calculations.
The supported currencies:- USD (default)
- EUR
- GBP
- JPY
- GEL
- ILS
- Current Status* - PropertyGenius helps you manage your property’s entire lifecycle - from the initial planning stage, through renovation (if needed), to a property that’s ready to sell or rent (short-, mid-, or long-term). Phase status values:
- PLAN (default) - Planning and preparation before work begins.
- WORK - Renovation, repairs, or other work is in progress.
- READY - The property is ready to be sold or rented.
- KeyBox 4-Digits PIN - Store your property’s 4-digit access code, such as a keybox PIN.
Import Properties from CSV
The Property Inventory lets you create, organize, and manage all your properties in one place. It guides you through every stage of the pr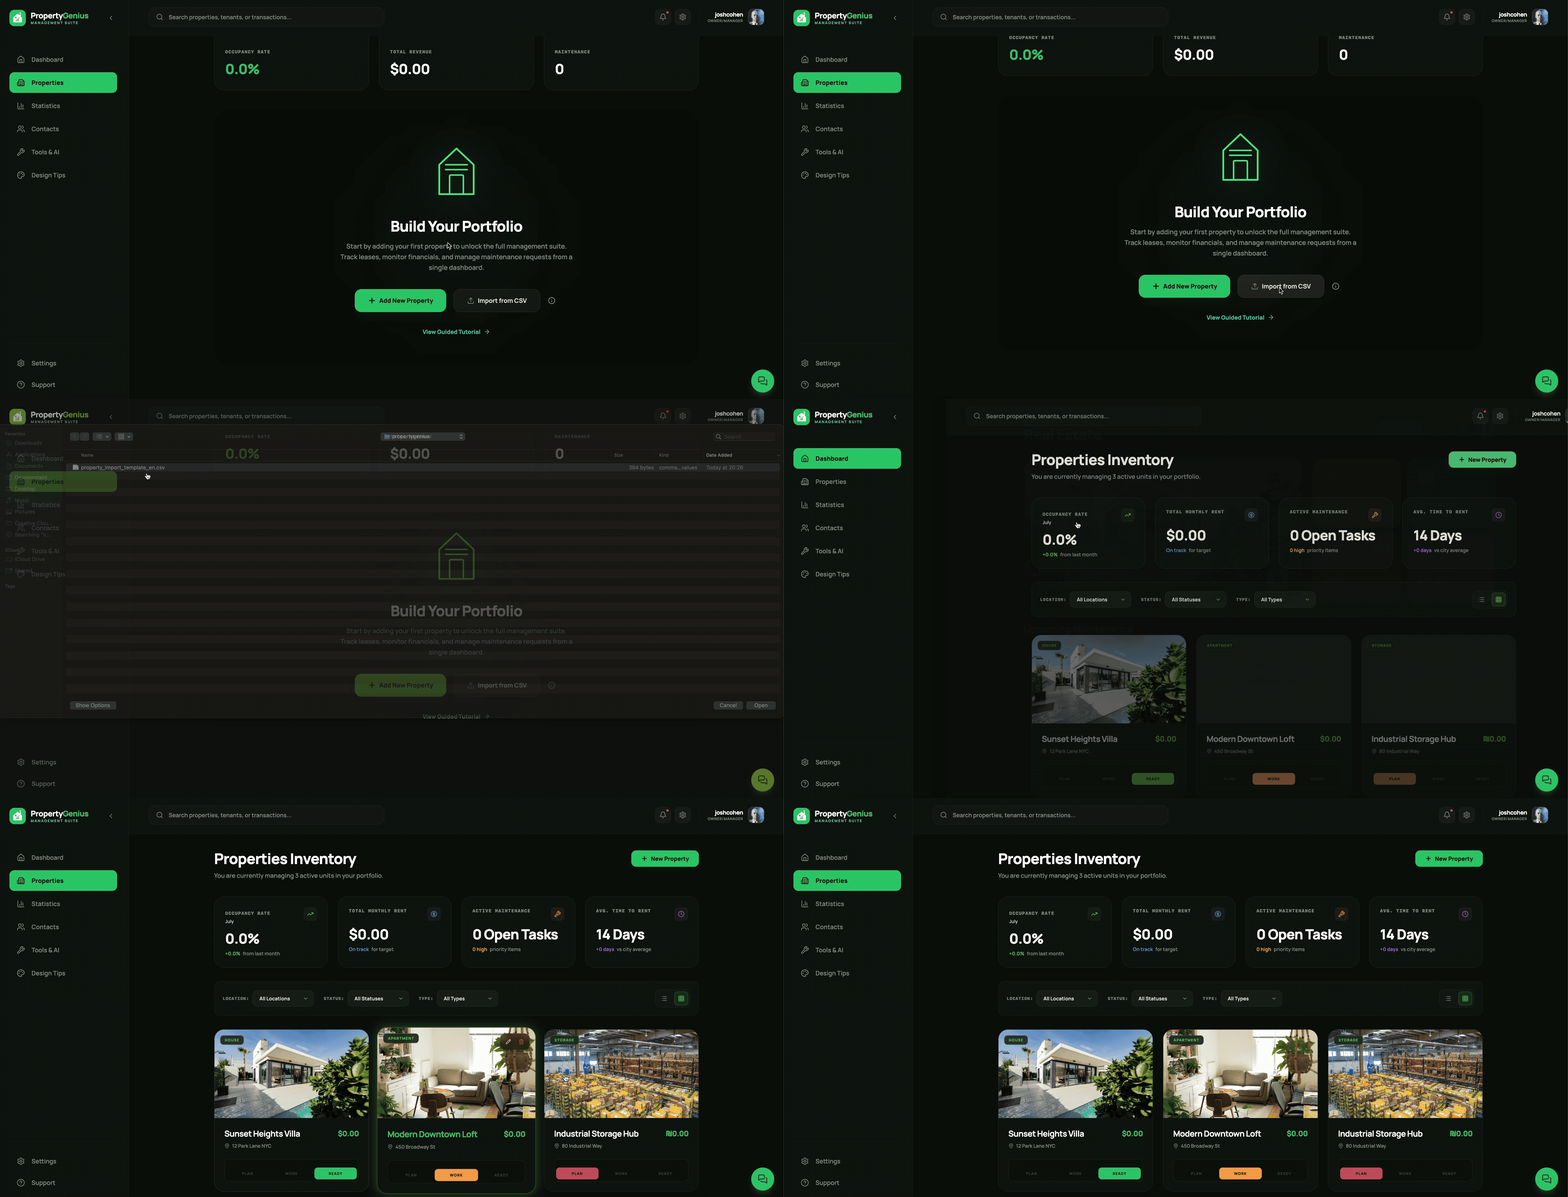
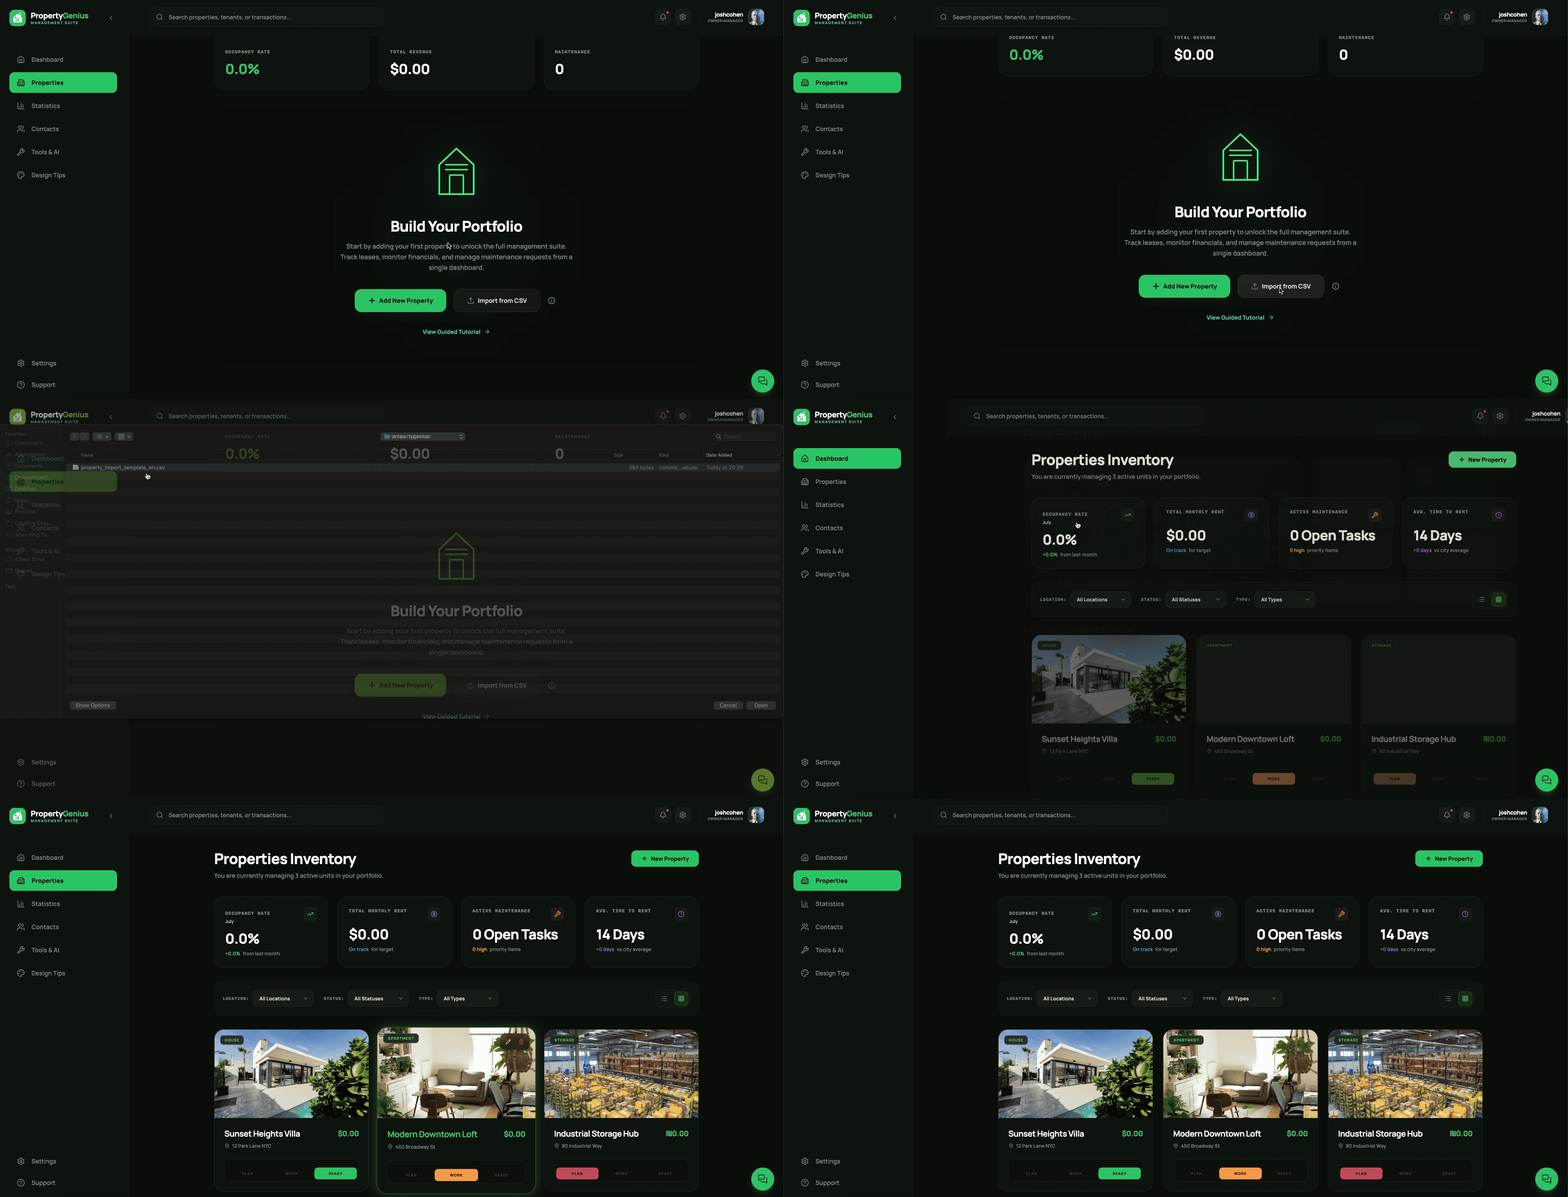
Uploading properties from CSV file
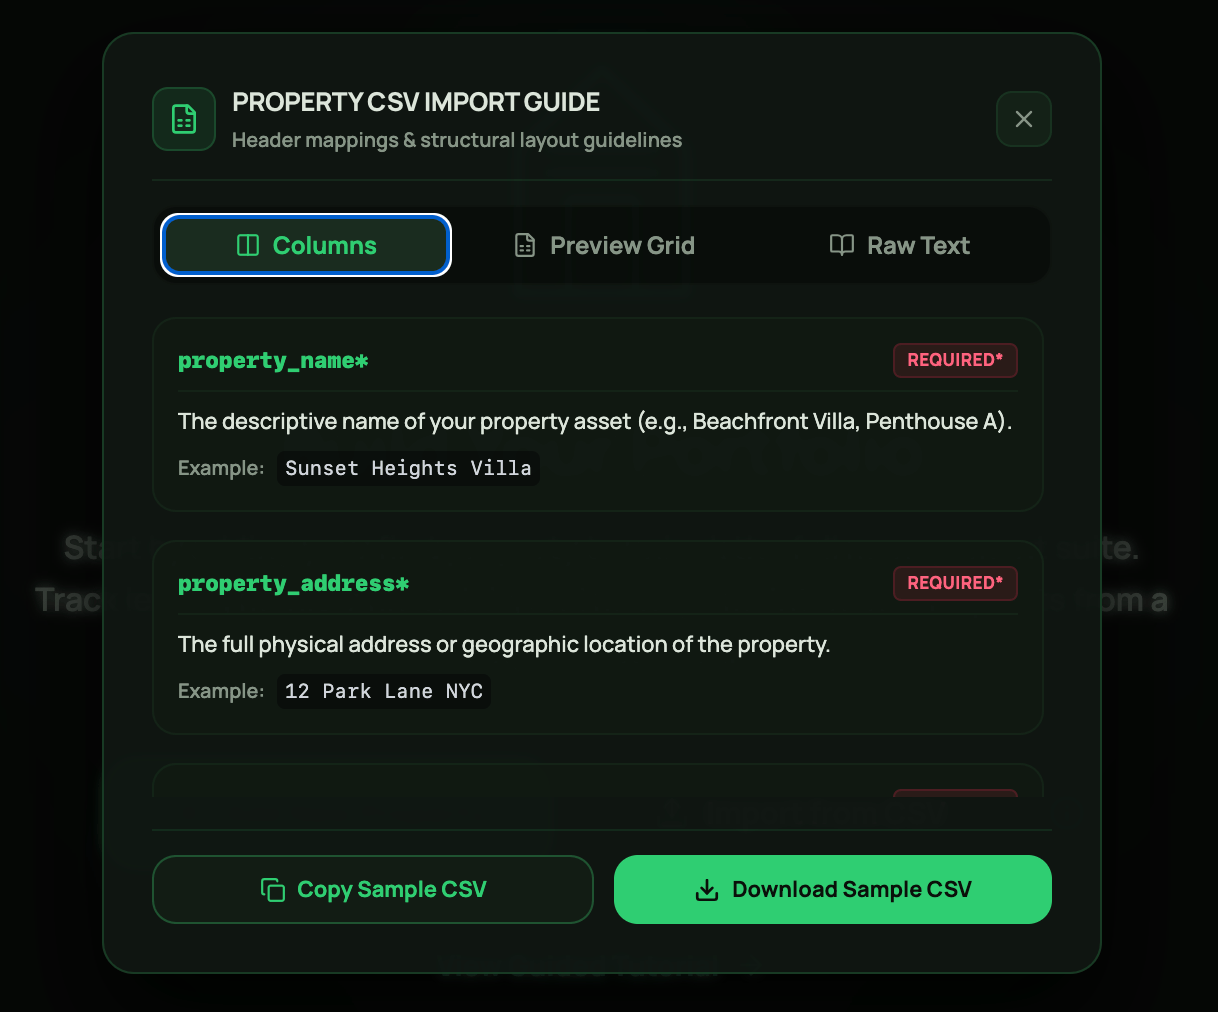
The following is an exaple of a CSV valid file with 3 properties:

Add Properties with PropertyGenius AI Assistant bot
You can also ask our AI Assistant to create a new property using a simple prompt that includes the details described above.Prefer speaking instead of typing? Use our voice-to-text feature and simply tell the assistant what you’d like to create.
Prompt Example:
Create a new property named ‘Central Park Condo’. Set the property type to ‘CONDO’, the address inside the ‘Location Details’ field to ‘W 59th St, New York. Set the ‘Property Currency’ field to USD, and the status to ‘Ready’. For the ‘Property Profile’ field, use the image from the following URL: https://encrypted-tbn0.gstatic.com/images?q=tbn:ANd9GcR5QbOYPp9sX6Z2IRfRgn9PceEFat6Im4BJJX5i6pQiMA&s=10
Create a new property named ‘Central Park Condo’. Set the property type to ‘CONDO’, the address inside the ‘Location Details’ field to ‘W 59th St, New York. Set the ‘Property Currency’ field to USD, and the status to ‘Ready’. For the ‘Property Profile’ field, use the image from the following URL: https://encrypted-tbn0.gstatic.com/images?q=tbn:ANd9GcR5QbOYPp9sX6Z2IRfRgn9PceEFat6Im4BJJX5i6pQiMA&s=10
Click here to learn more on the AI-assistant bot
Working with Property Item
Once you’ve created a property, you can begin managing it by adding milestones, tasks, expenses, tenants, and other related activities. Each property provides features and attributes tailored to its current lifecycle phase, helping you manage every stage efficiently.Property Lifecycle
Each property progresses through three main lifecycle phases:- PLAN - Search for the right property, complete the purchase, sign contracts, and manage all planning activities, including legal, financial, tax, and regulatory processes.
- WORK - Manage renovations, construction, interior design, repairs, and any other work required to prepare the property for rental or sale.
- READY - The property is fully prepared and ready to be rented or sold.

The initial lifecycle phase is selected when you create a property on the Add Property page.
If no phase is specified, the property is created in the PLAN phase by default. You can update a property’s lifecycle phase at any time by editing the property’s details.
Note
- When you’ve completed a phase, turn on the Phase Completed toggle to automatically advance the property to the next lifecycle phase.
- To move the property back to the previous phase, simply turn off the Phase Completed toggle for the previous phase.
Planning Phase
The initial lifecycle phase is selected when you create a property on the Add Property page.If no phase is specified, the property is created in the PLAN phase by default.
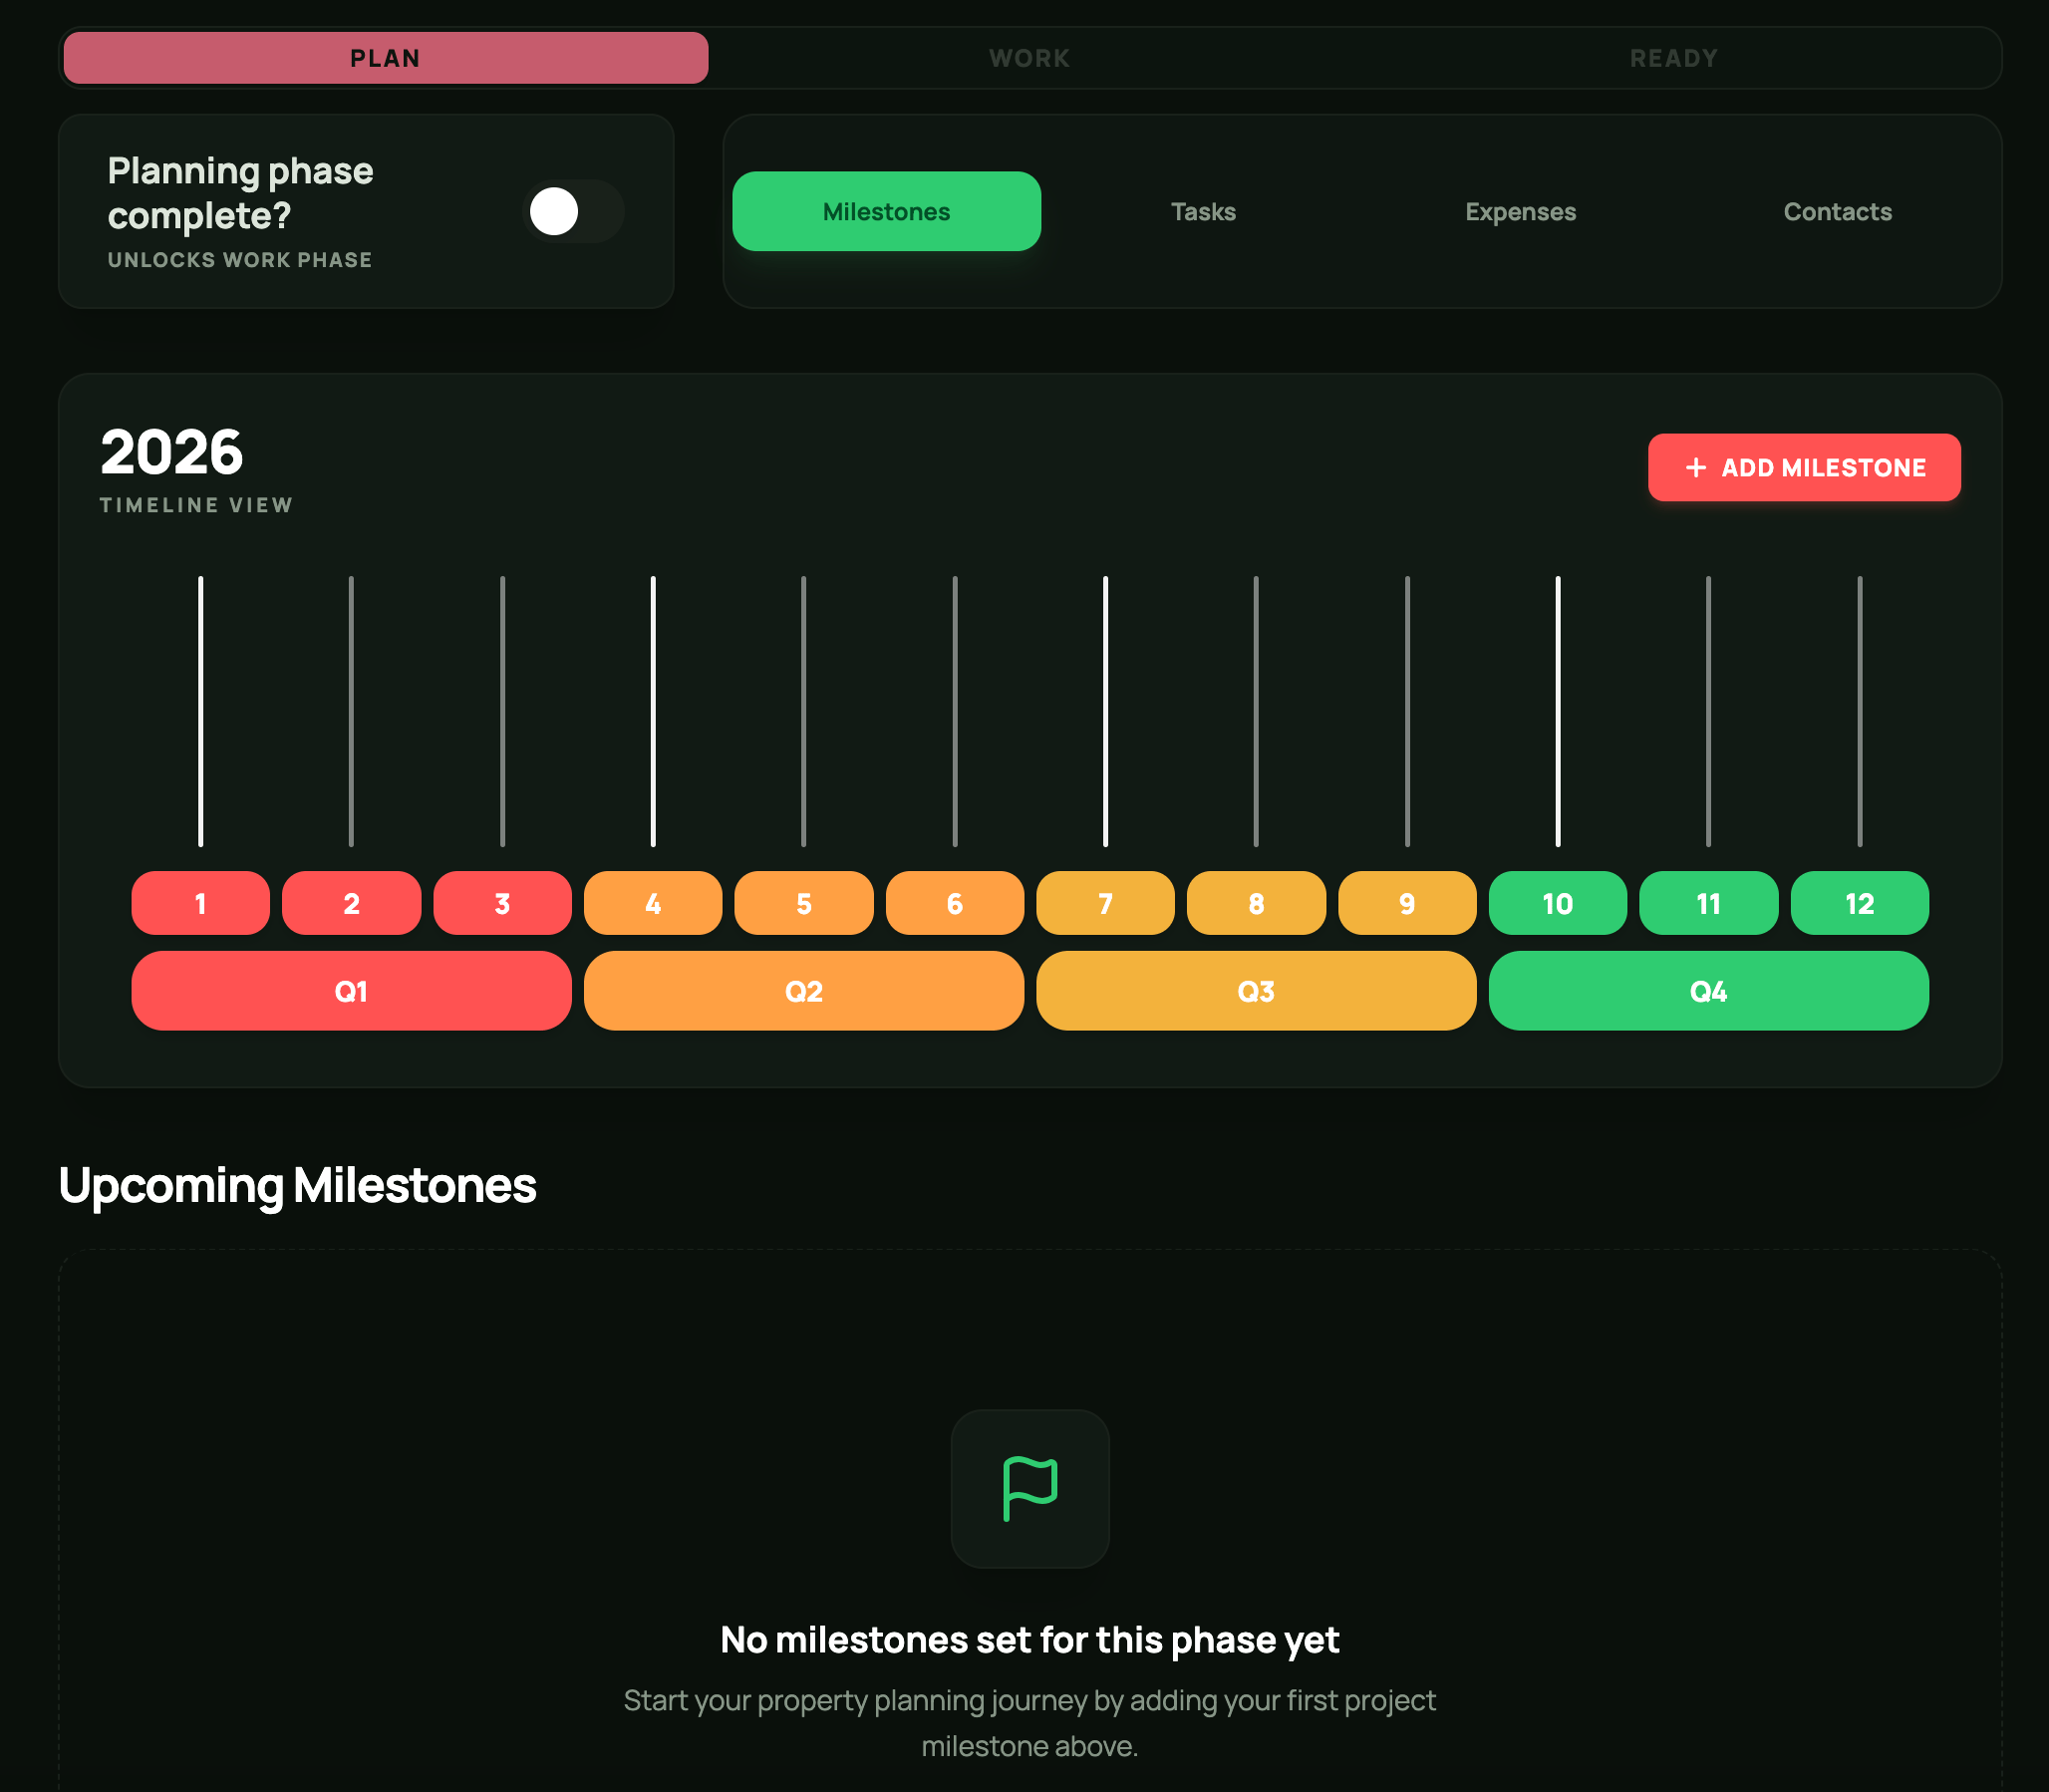
Property Planning Phase
Milestones
Define key milestones to stay organized and effectively manage your property’s planning phase. Milestones Timeline The Milestones Timeline component provides a visual representation of your milestones by displaying them as markers along a timeline. Hover over a milestone marker to view its name. Clicking a marker will automatically navigate you to the corresponding milestone in the list below.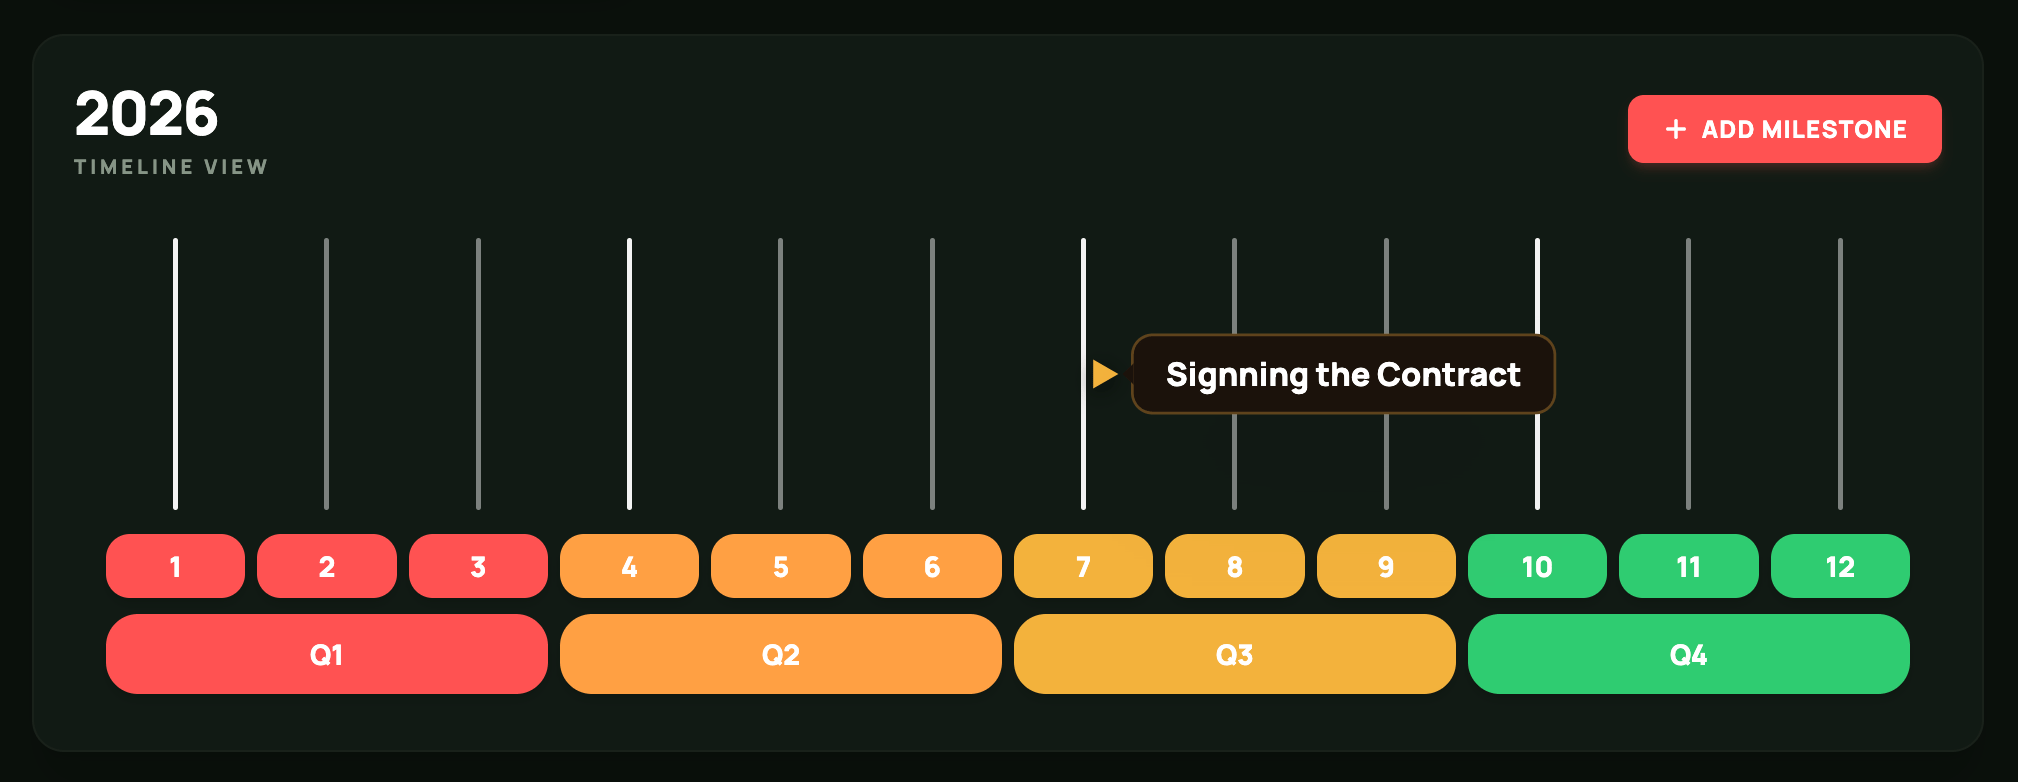
Milestones Timeline
Add Milestone Click + Add Milestone to create a new milestone.
The Add Milestone page includes the following fields and options:
- Name – Enter a meaningful name for the milestone.
- Notes – Add any relevant notes or details.
- Date – Set the milestone date.
- Quick Attachments – Attach related documents, images, tasks, and expenses.
- Assigned Contacts – Link contacts from the Contacts page or create new ones directly from the milestone.
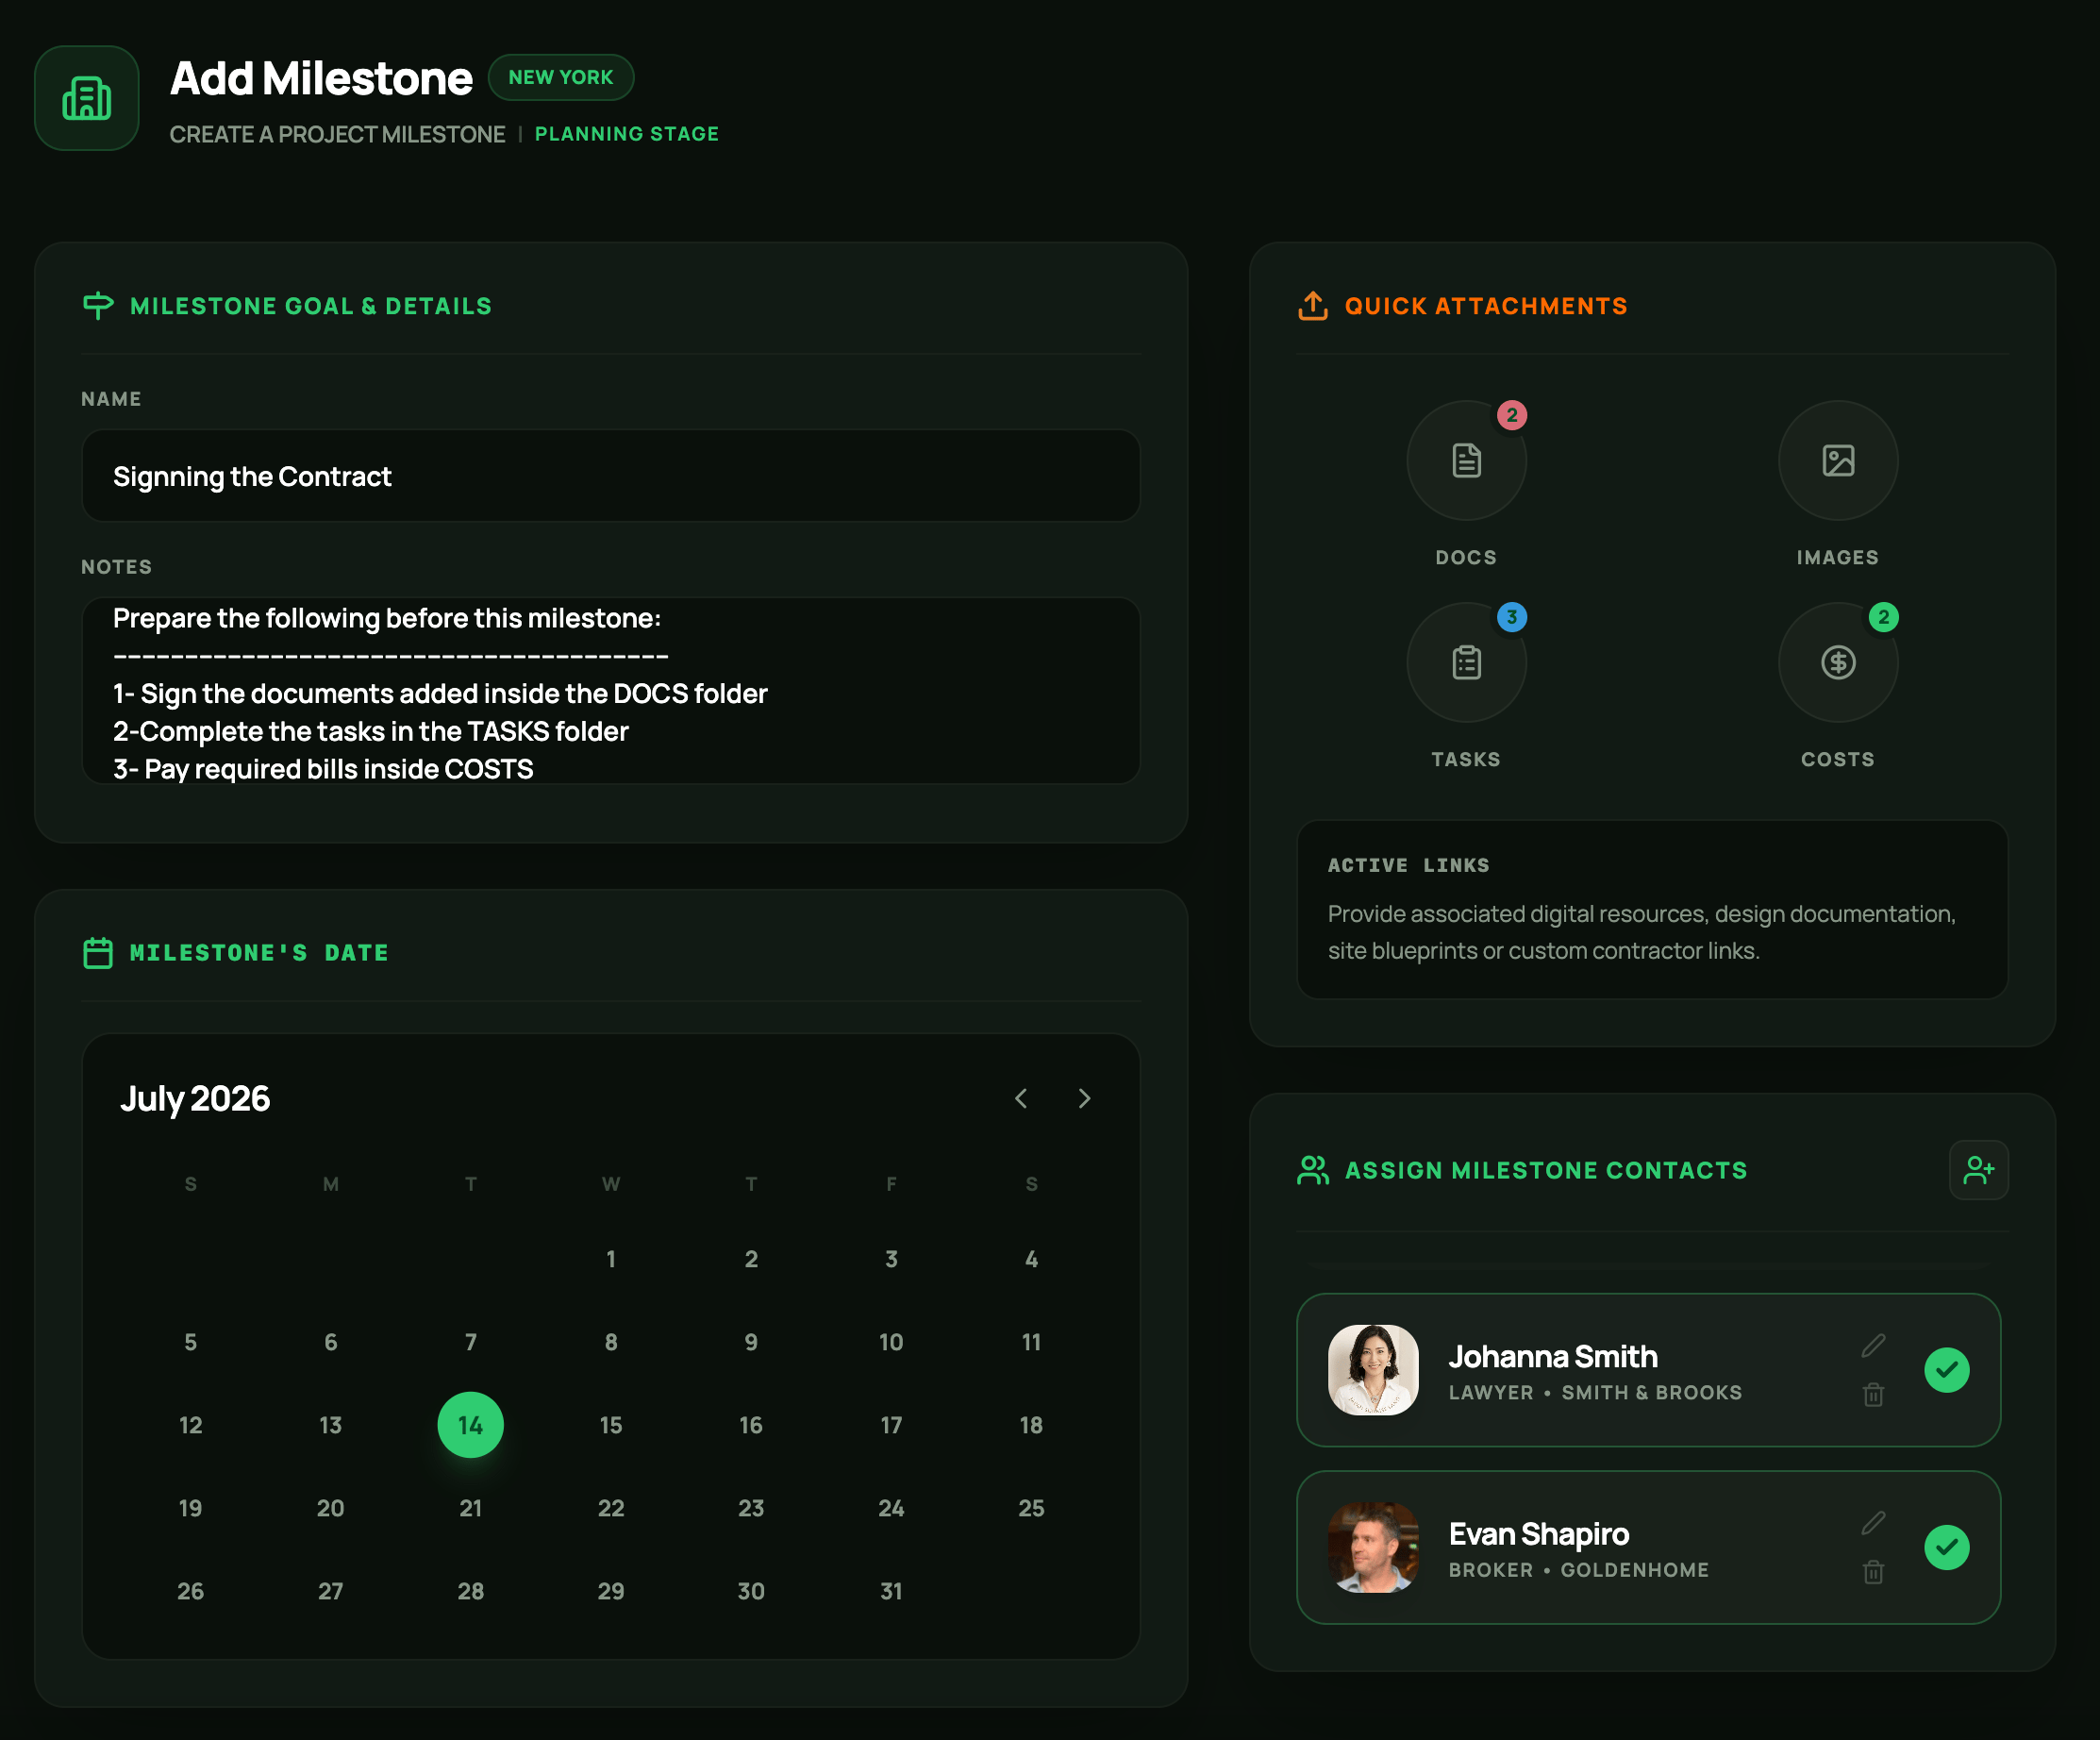
Add Milestone
Tasks
In addition to milestone-specific tasks, the PLAN phase also lets you create property-level tasks from the Tasks tab.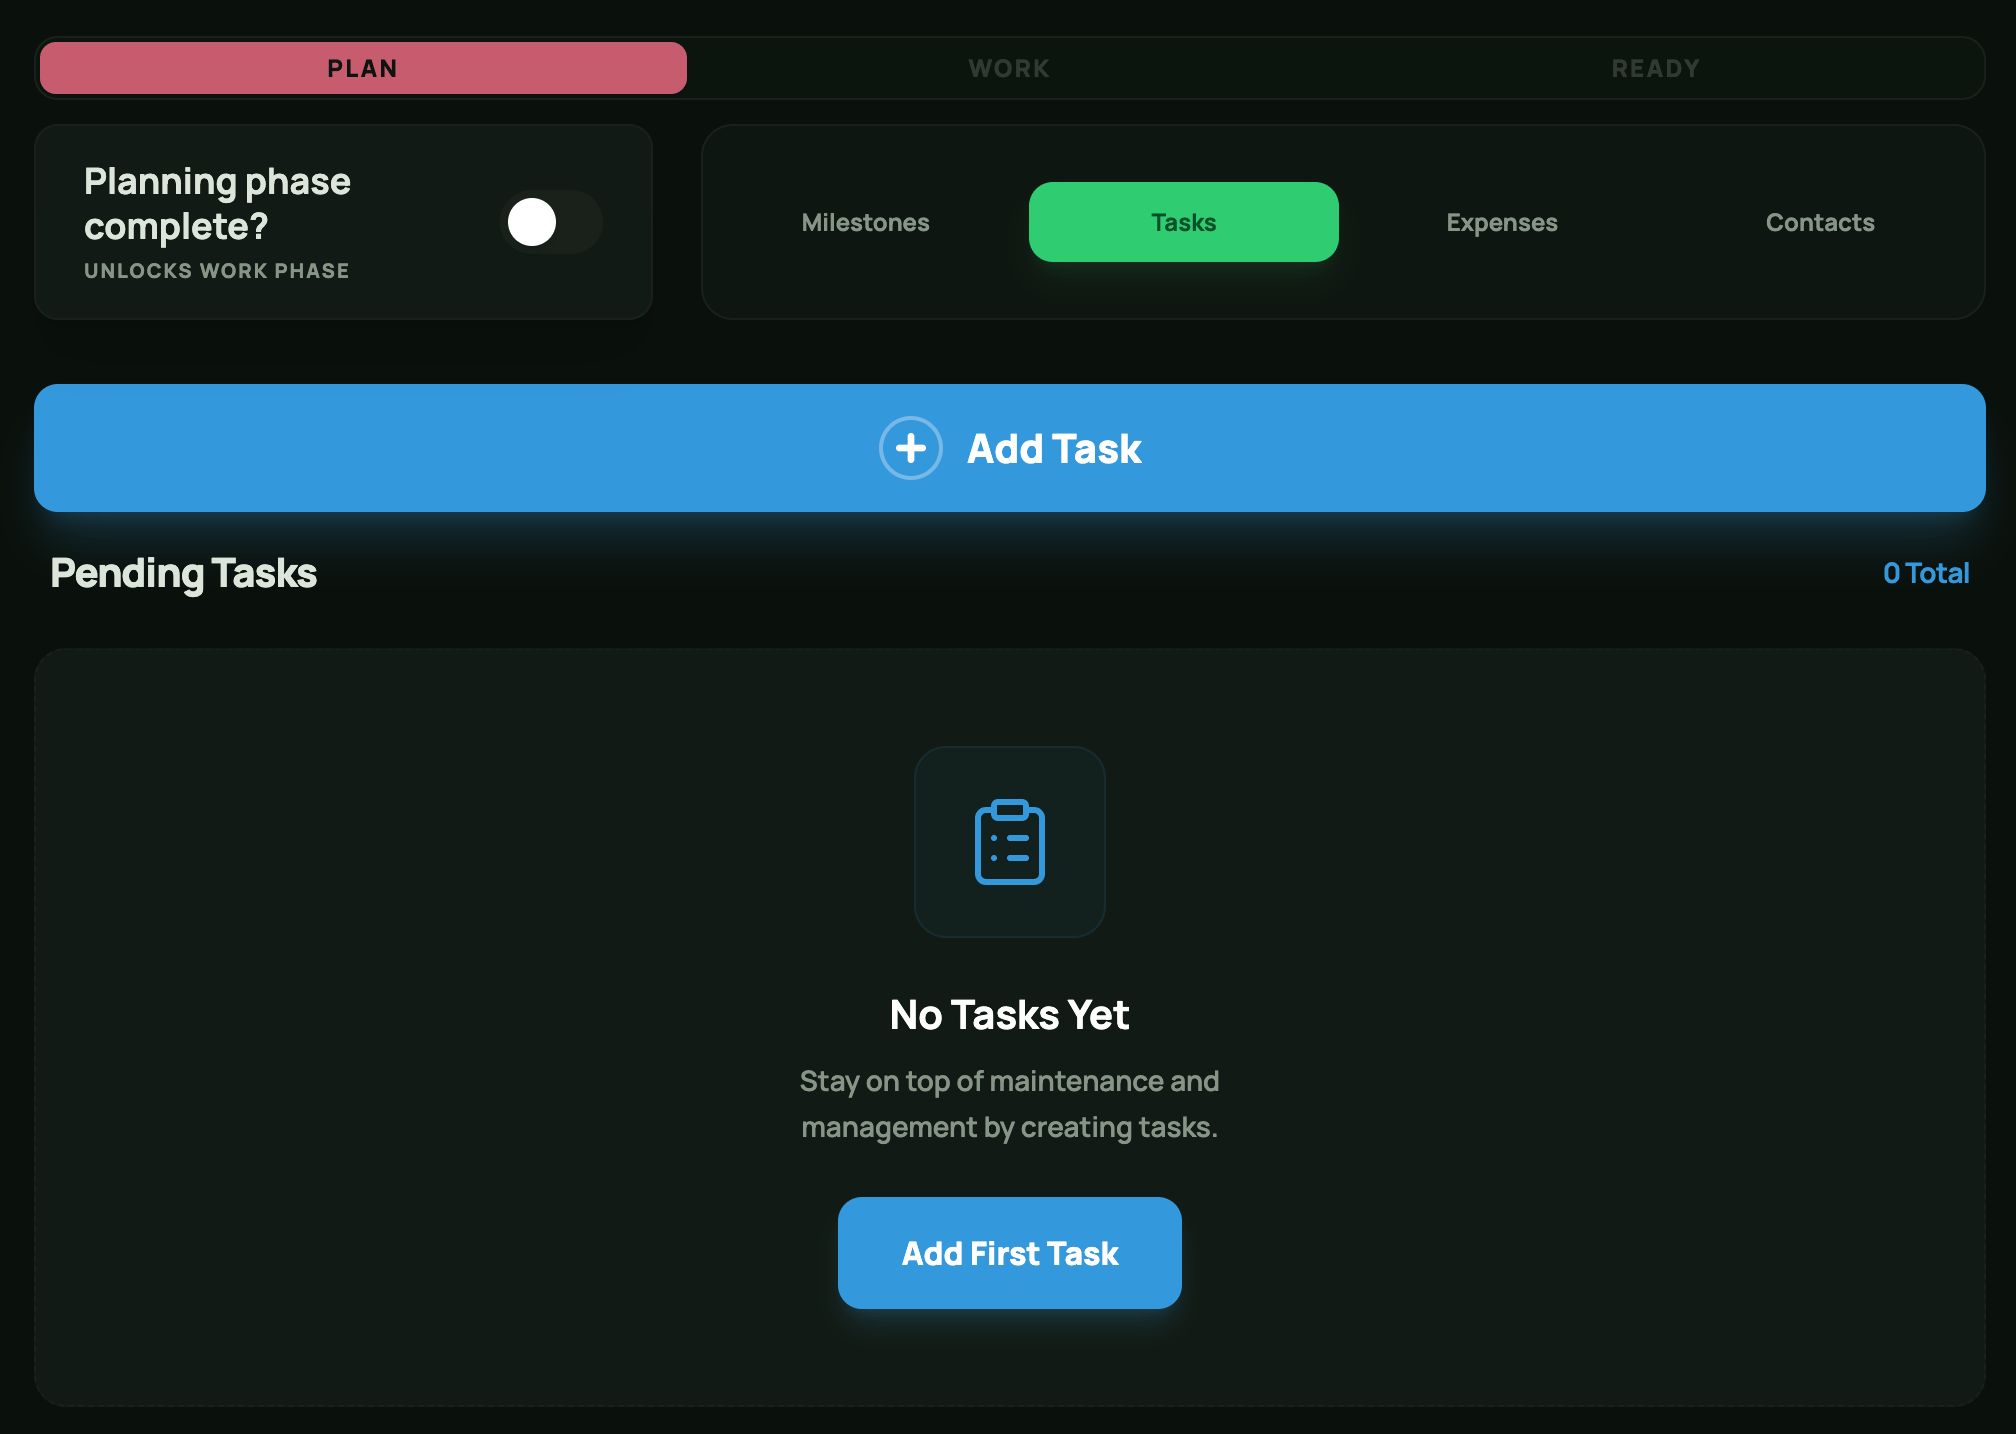
Planning Phase Tasks
Add/Edit Task
A task includes the following fields and options:- Name – Enter a descriptive name for the task.
- Notes – Add any relevant details or instructions.
- Reminders – Schedule reminders to help you stay on track. PropertyGenius can send notifications through multiple channels, including in-app alerts, platform notifications (such as your web browser or Android device), and email. Notification preferences can be customized. See Reminders page to learn more.
- Due Date – Set the deadline for completing the task.
- Task Status – When the task is complete, turn on the Completed toggle to keep your work organized and up to date.
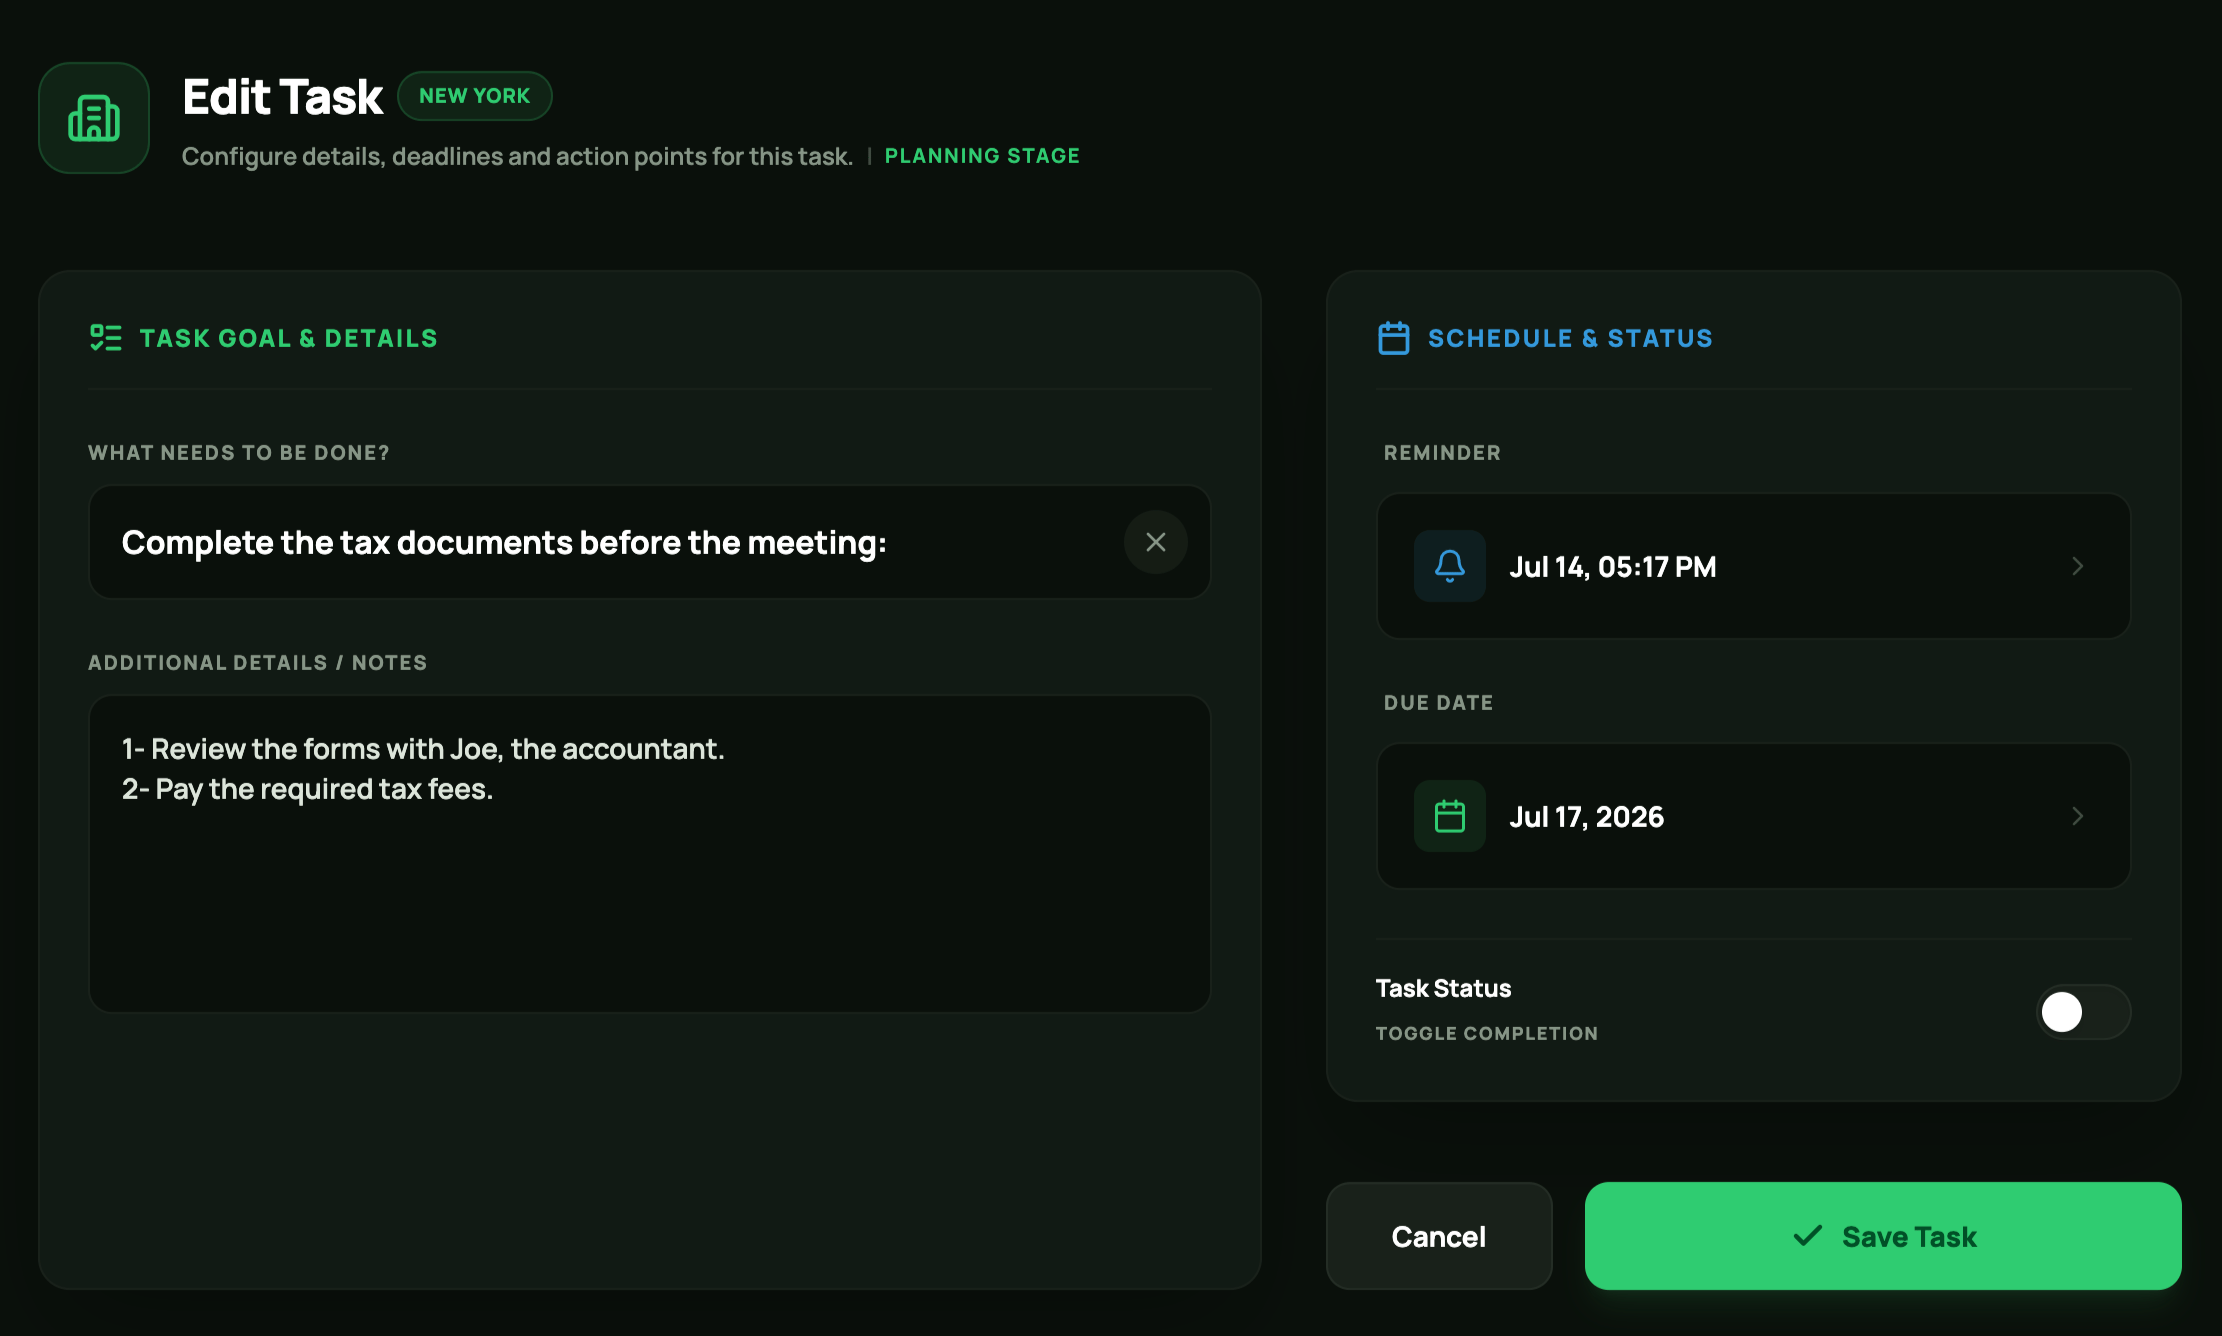
Add/Edit Task
Expenses
The Expenses tab lets you manage all expenses and bills related to your property’s PLAN phase in one place. Like tasks, expenses created within a milestone are automatically displayed in the property’s Expenses tab, giving you a complete view of all planning costs. Each expense is recorded in the currency defined for the property and is automatically included in your financial analytics, including Income & Expenses and Profit & Loss reports. These reports can be exported or shared with your accountant whenever needed.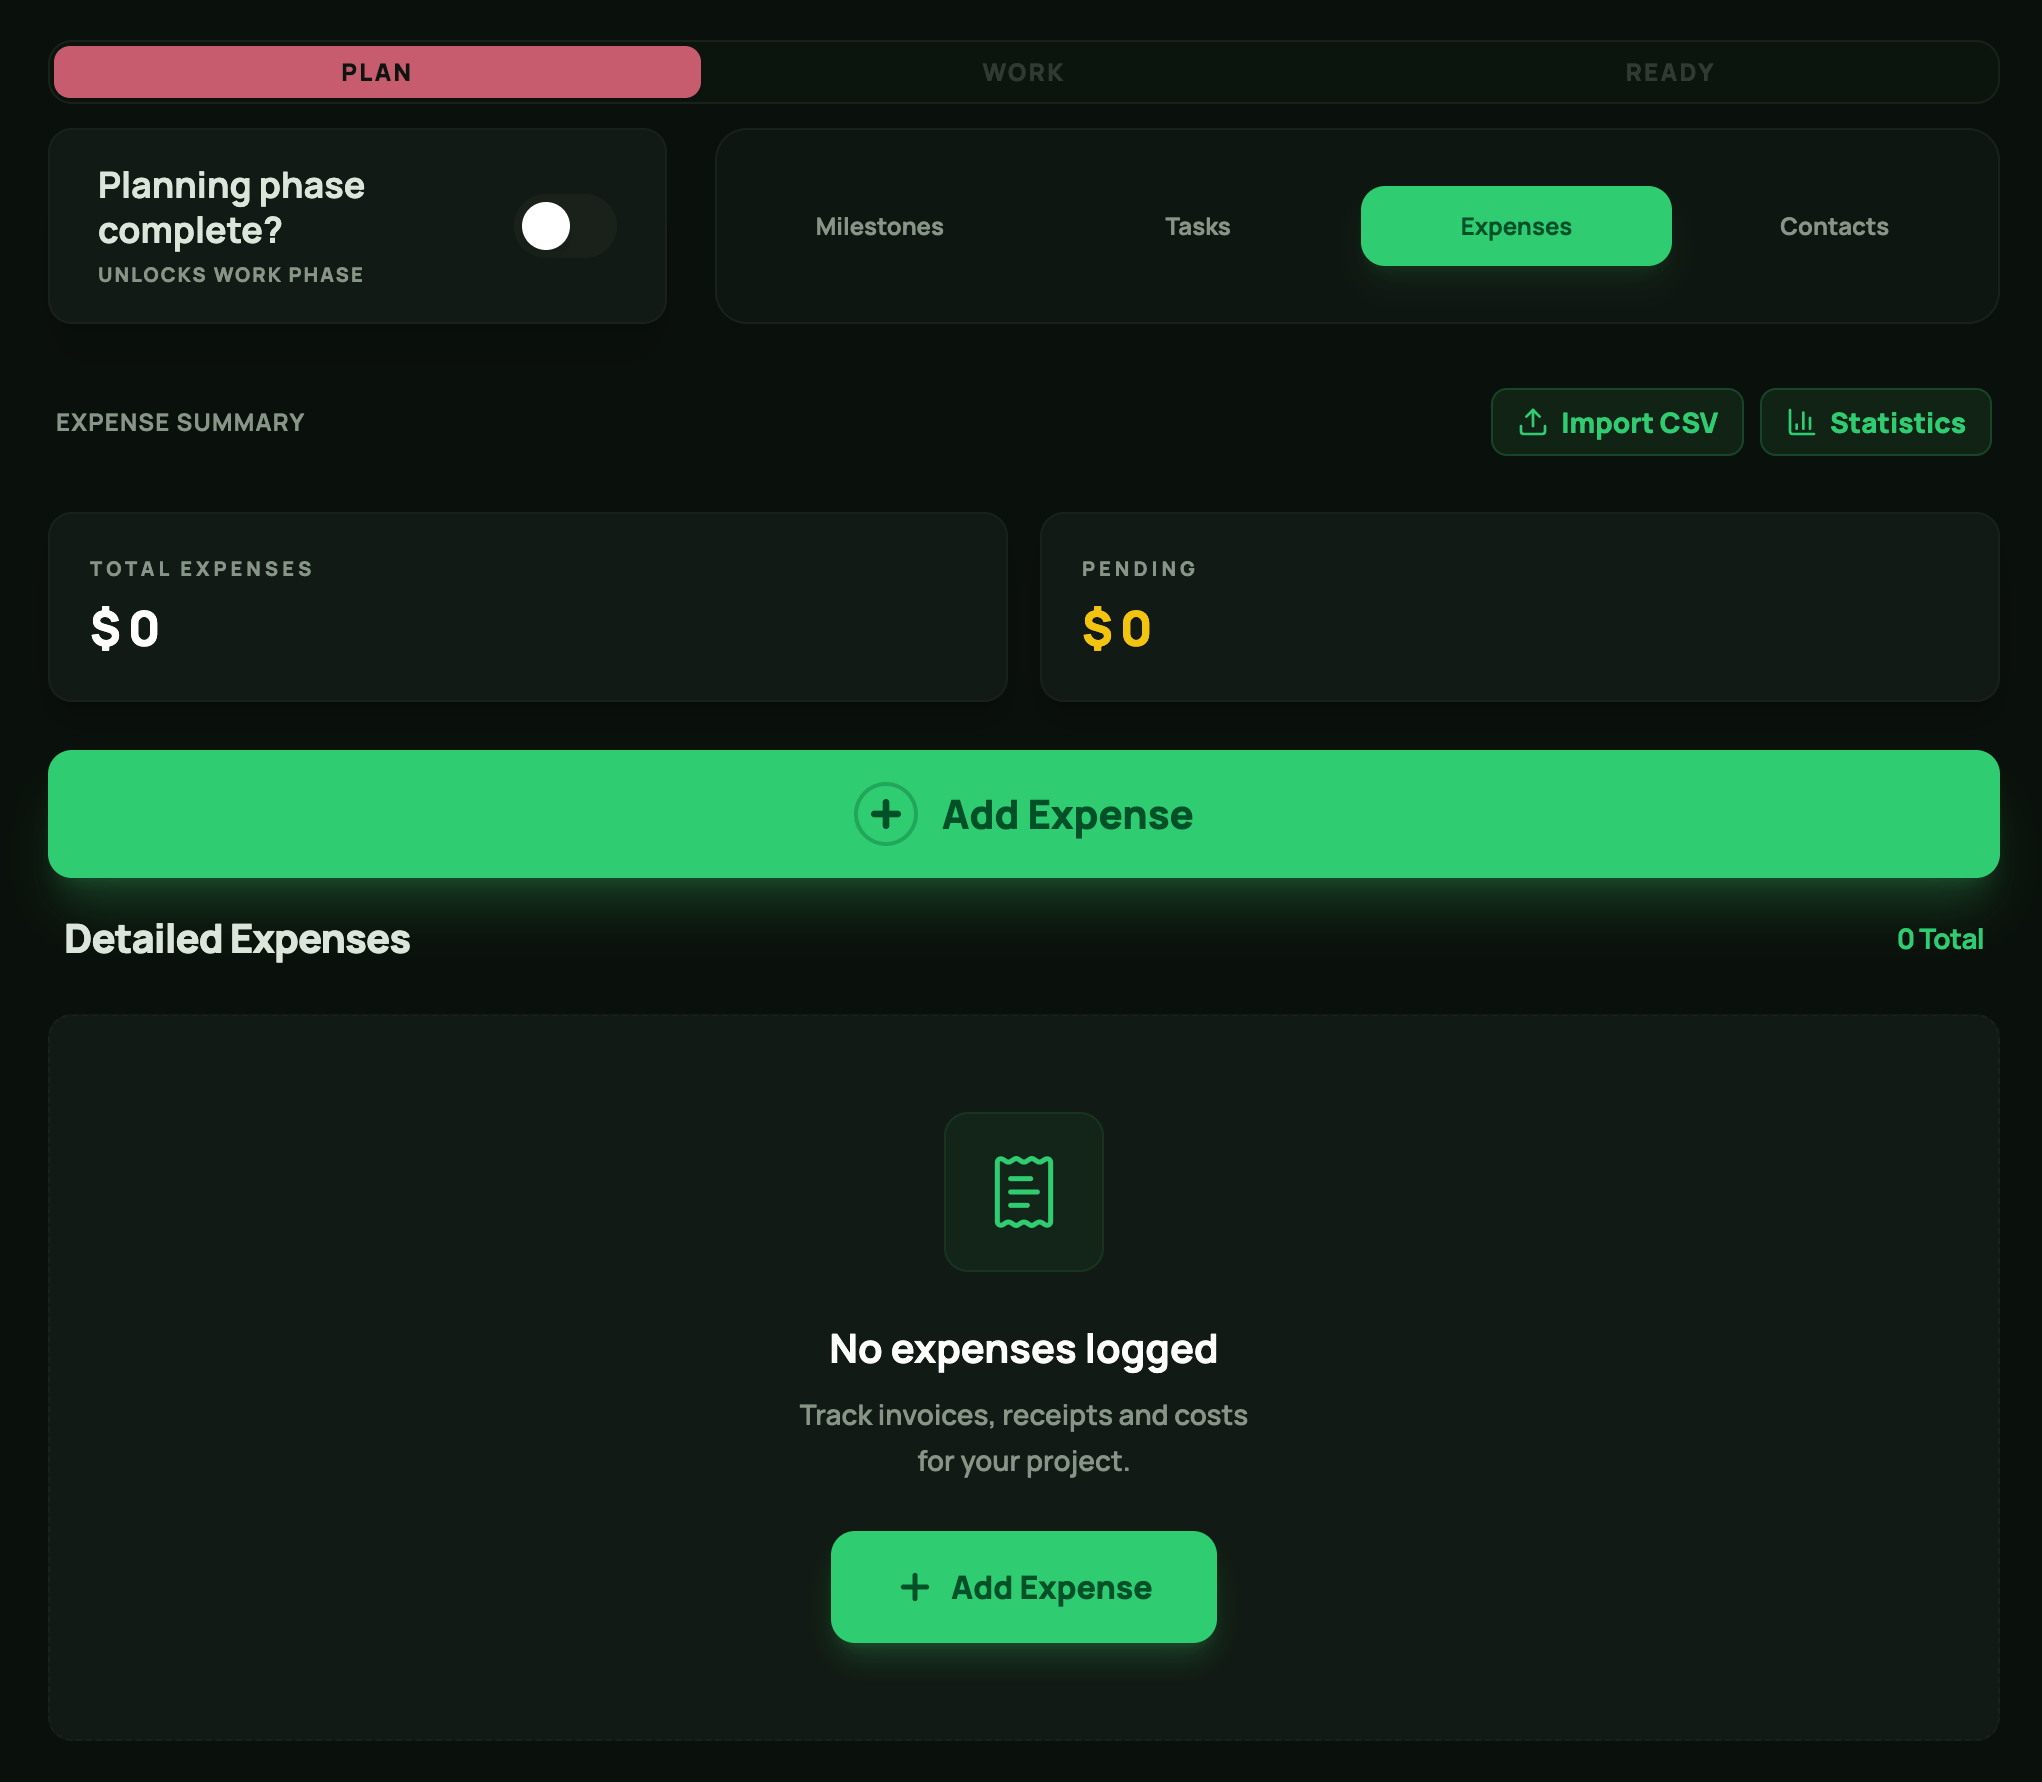
Planning Phase Expenses
Add/Edit Expense
Each Expense item includes the following fields:- Type – Select the expense type or service category.
- Amount – Enter the expense amount.
- Date – Specify the expense date.
- Recurring Interval – Choose how often the expense recurs: One Time, Weekly, Monthly, Every 3 Months, Every 6 Months, or Yearly.
- Recurring Amount – Enter the recurring payment amount (available for recurring expenses only).
- Notes & Description – Optionally add notes or additional details.
- Reminders – Set one or more payment reminders.
- Mark as Paid – Turn on this option once the expense has been paid.
- File Attachments – Attach invoices, receipts, or any other supporting documents.
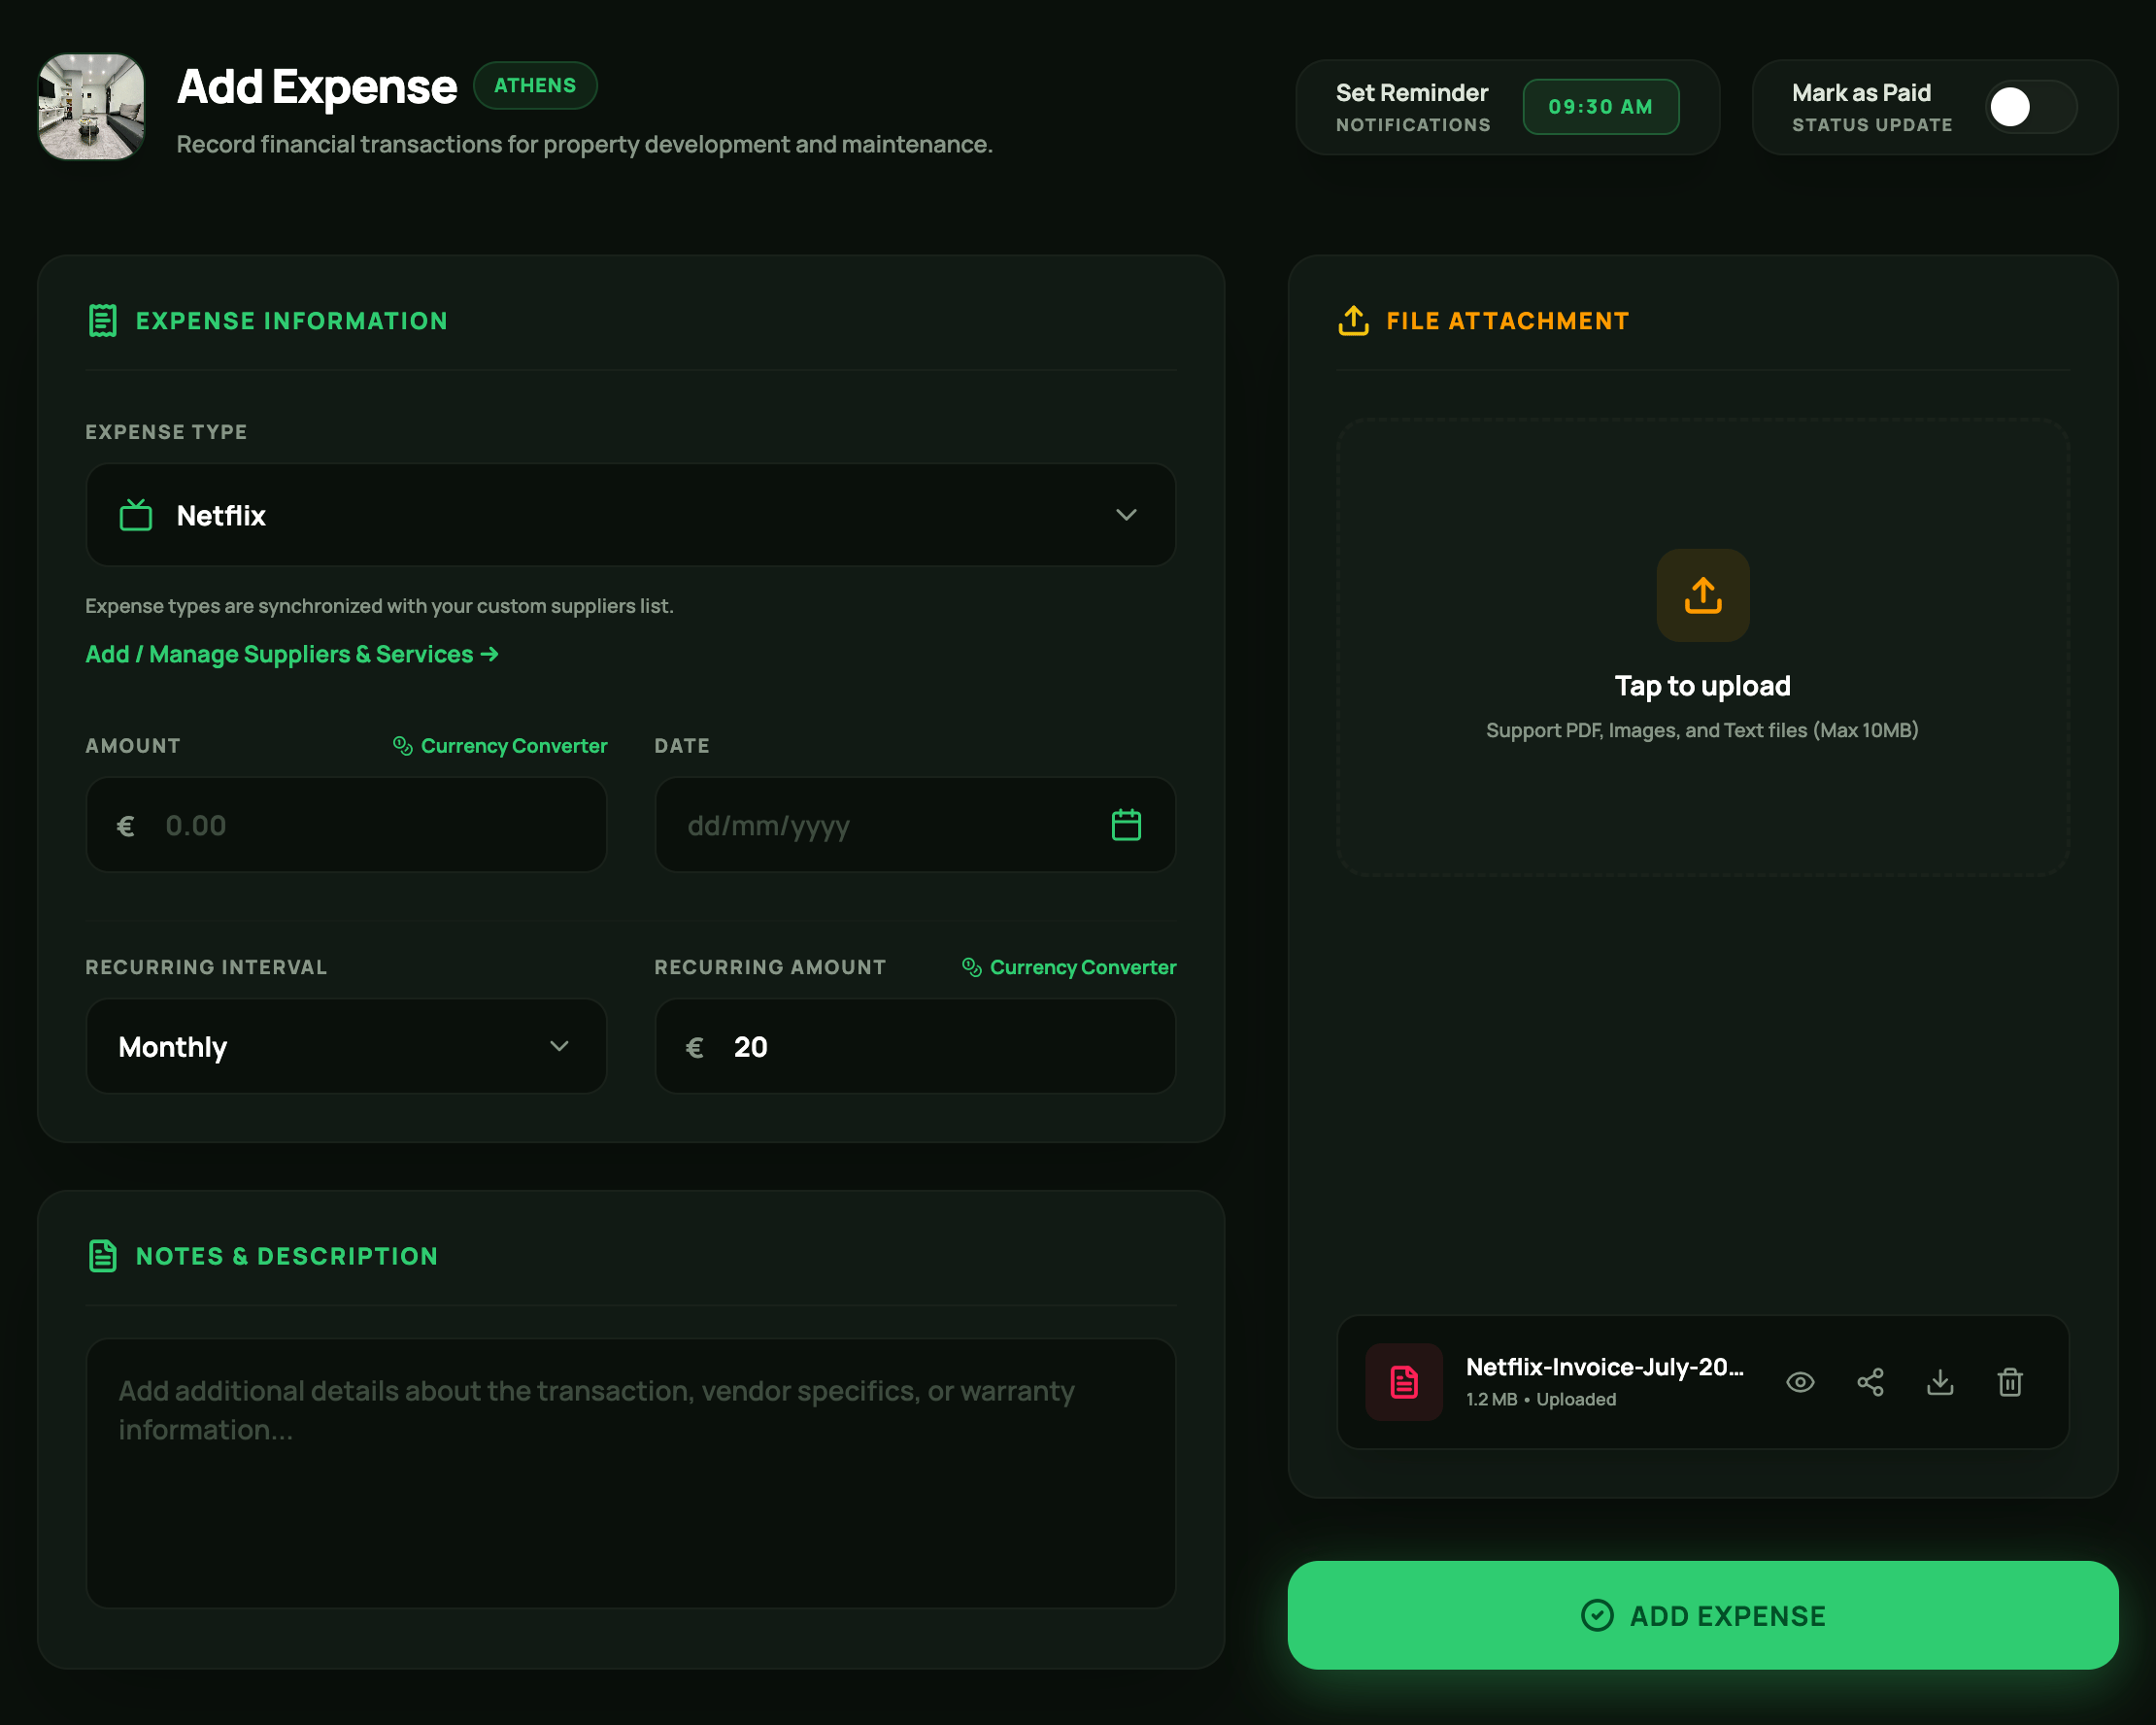
Add Expense
Expenses Groups
To keep your expenses organized, PropertyGenius automatically groups expenses of the same type into a single parent item. Click a parent item to expand it and view all of its individual expense entries.Import Expenses from CSV
To save time, you can upload multiple existing expenses at once instead of adding each expense manually. This feature makes it quick and easy to import your expense records in bulk.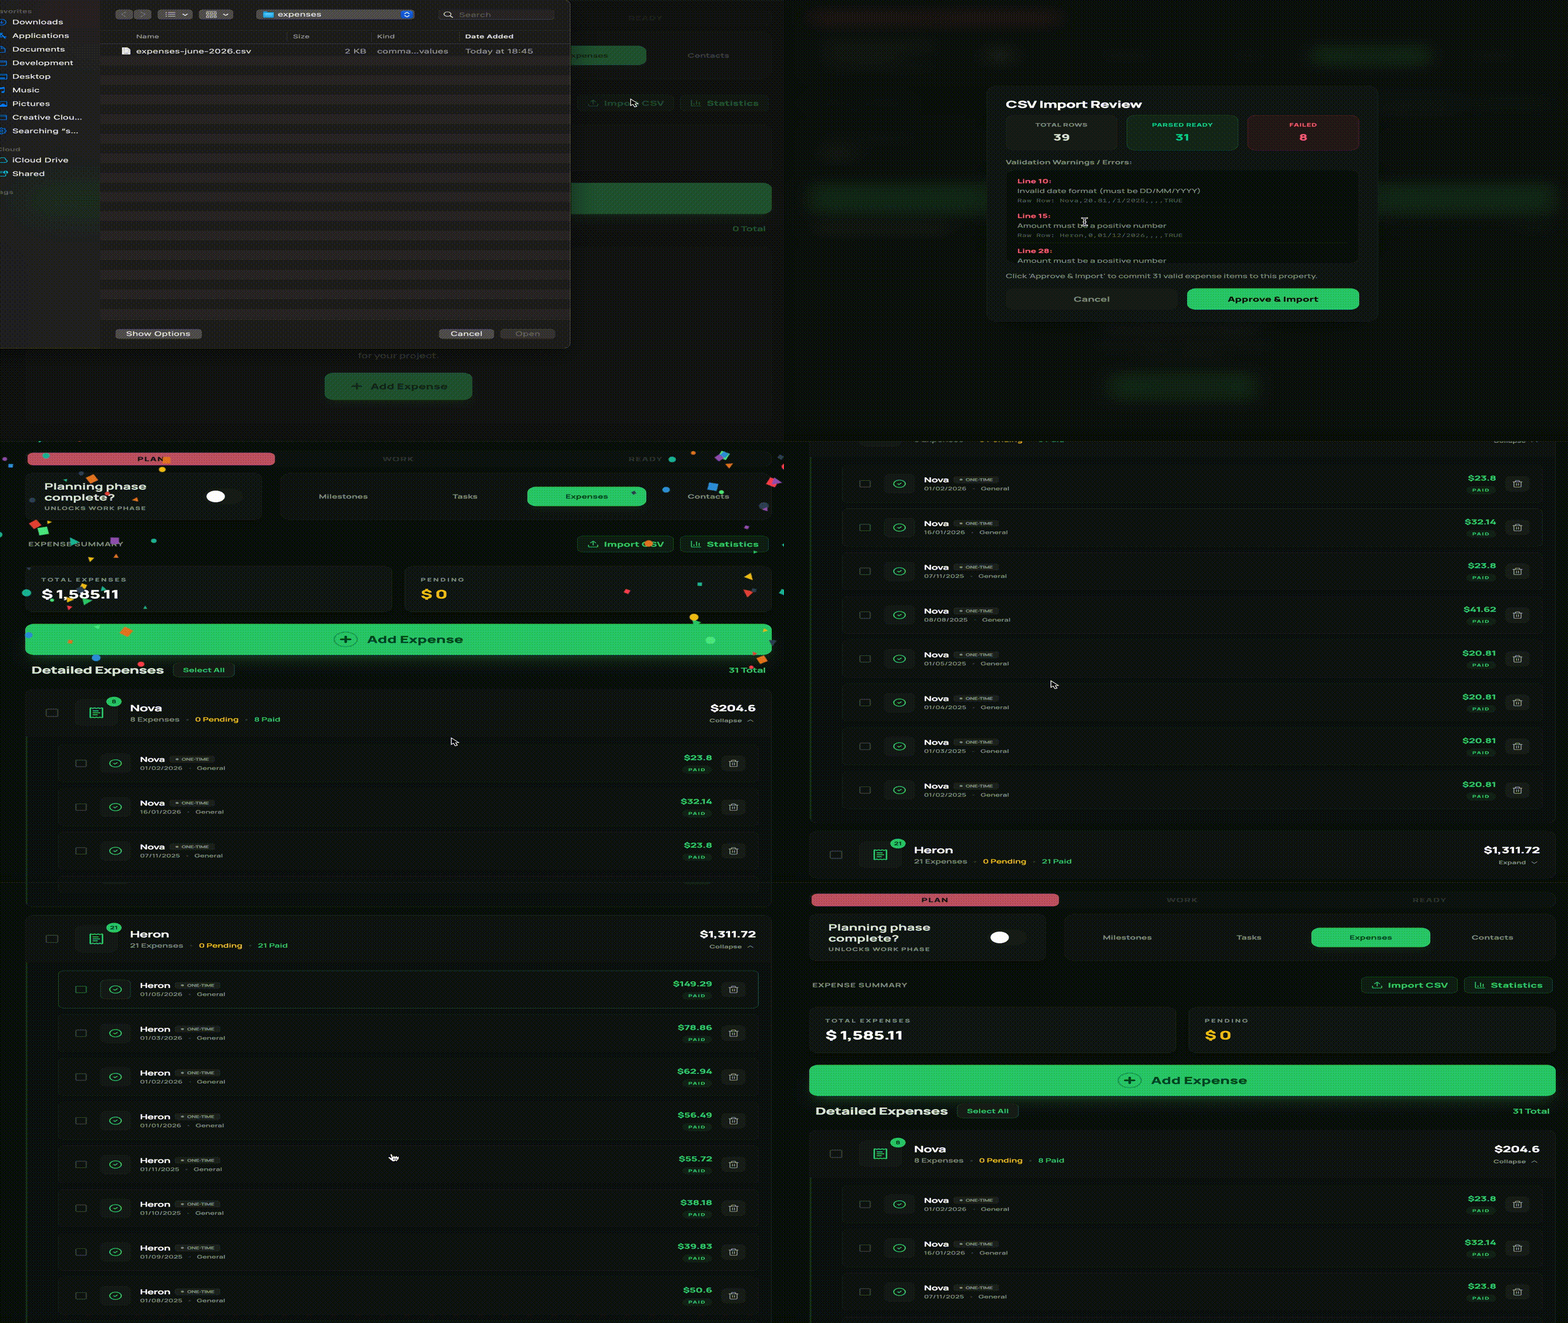
The CSV file should include the following fields:
- expense_type* – The name of the service provider or supplier you paid. This value must already be defined under Settings → Suppliers & Services.
- amount* – The expense or bill amount.
- date* – The date of the expense or bill.
- description – Add any additional notes or details related to the expense.
- url – A URL link to a remote file or document attached to this expense item.
- remind_date – Set a reminder date for the expense payment.
- is_paid – Indicates the current payment status of the expense.

Expenses Statistics Drawer
Clicking Statistics in the Expenses tab opens a statistics drawer displaying bar charts for each expense type. The charts provide a yearly breakdown of expense performance based on the selected year.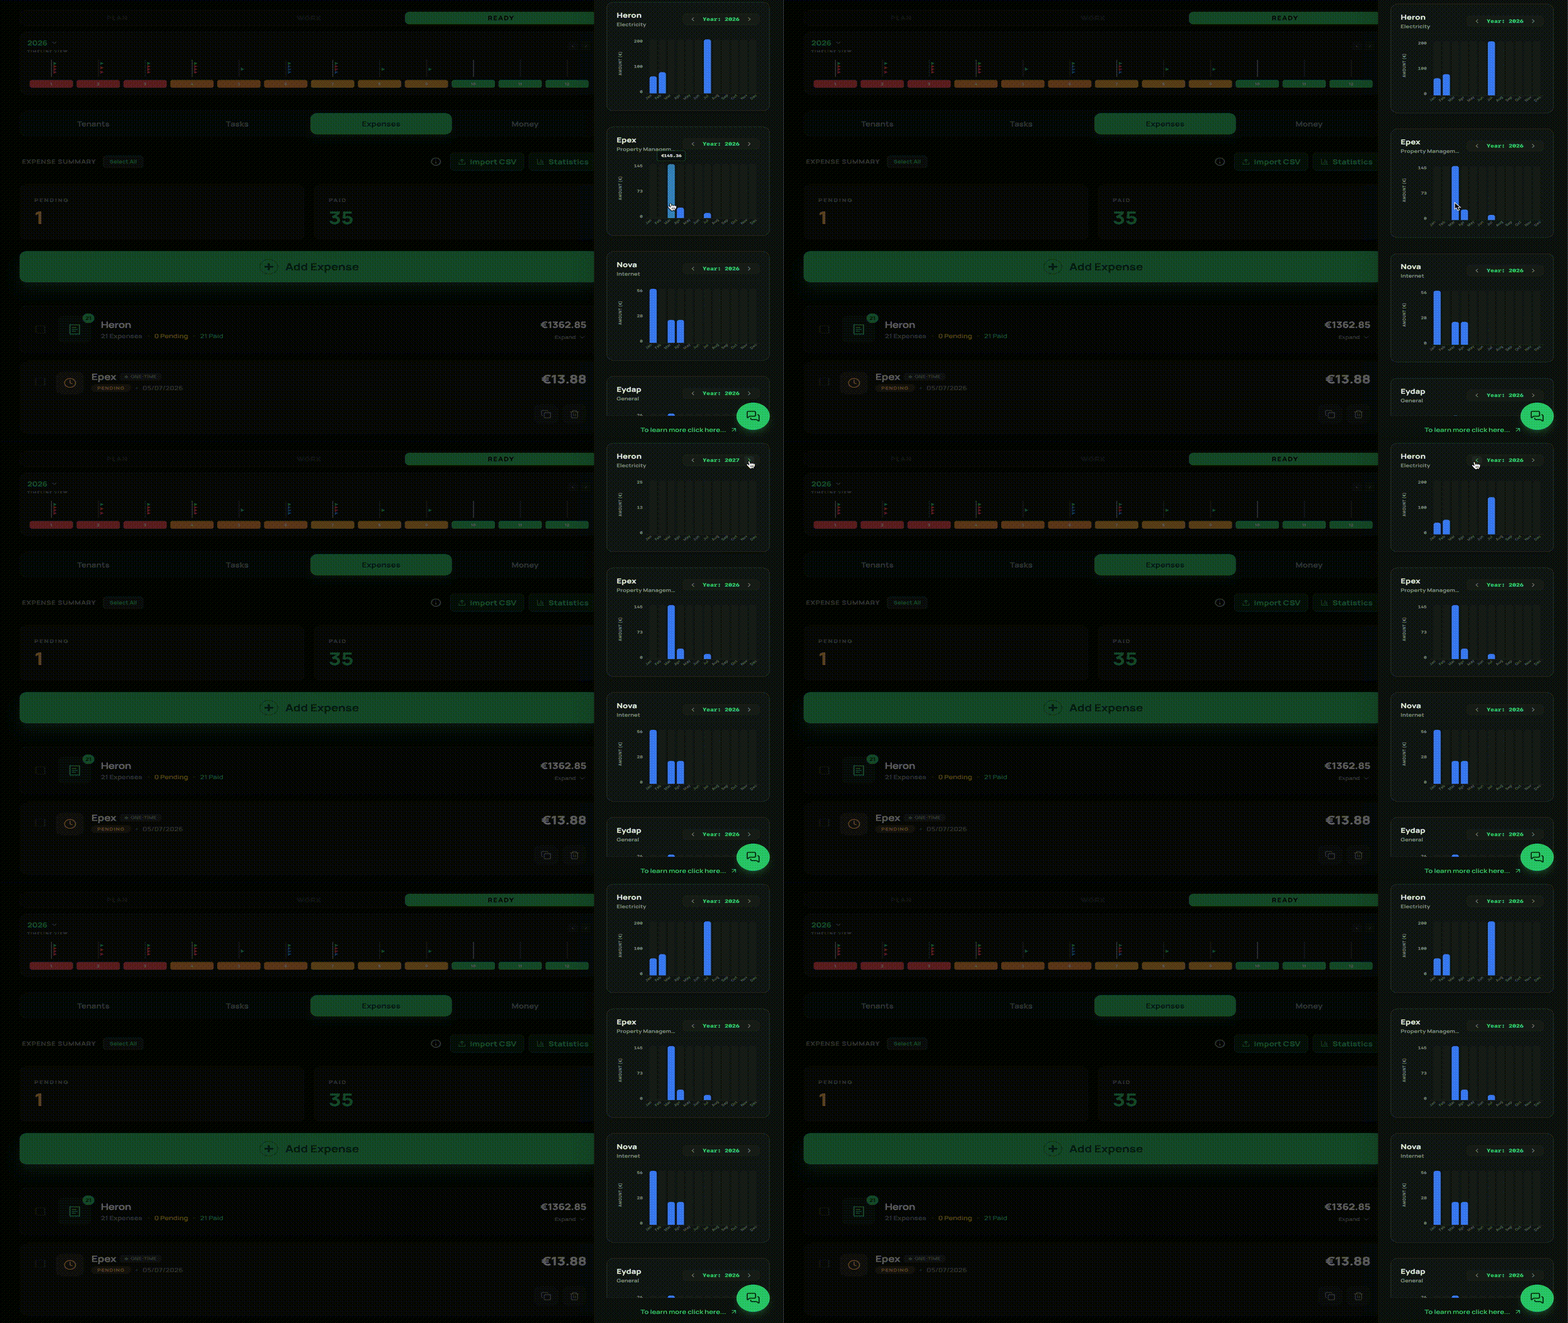
Expenses Statistics Drawer
Contacts
Add contacts for the Planning phase. Each contact will be automatically saved in the application’s main Contacts page for future reuse.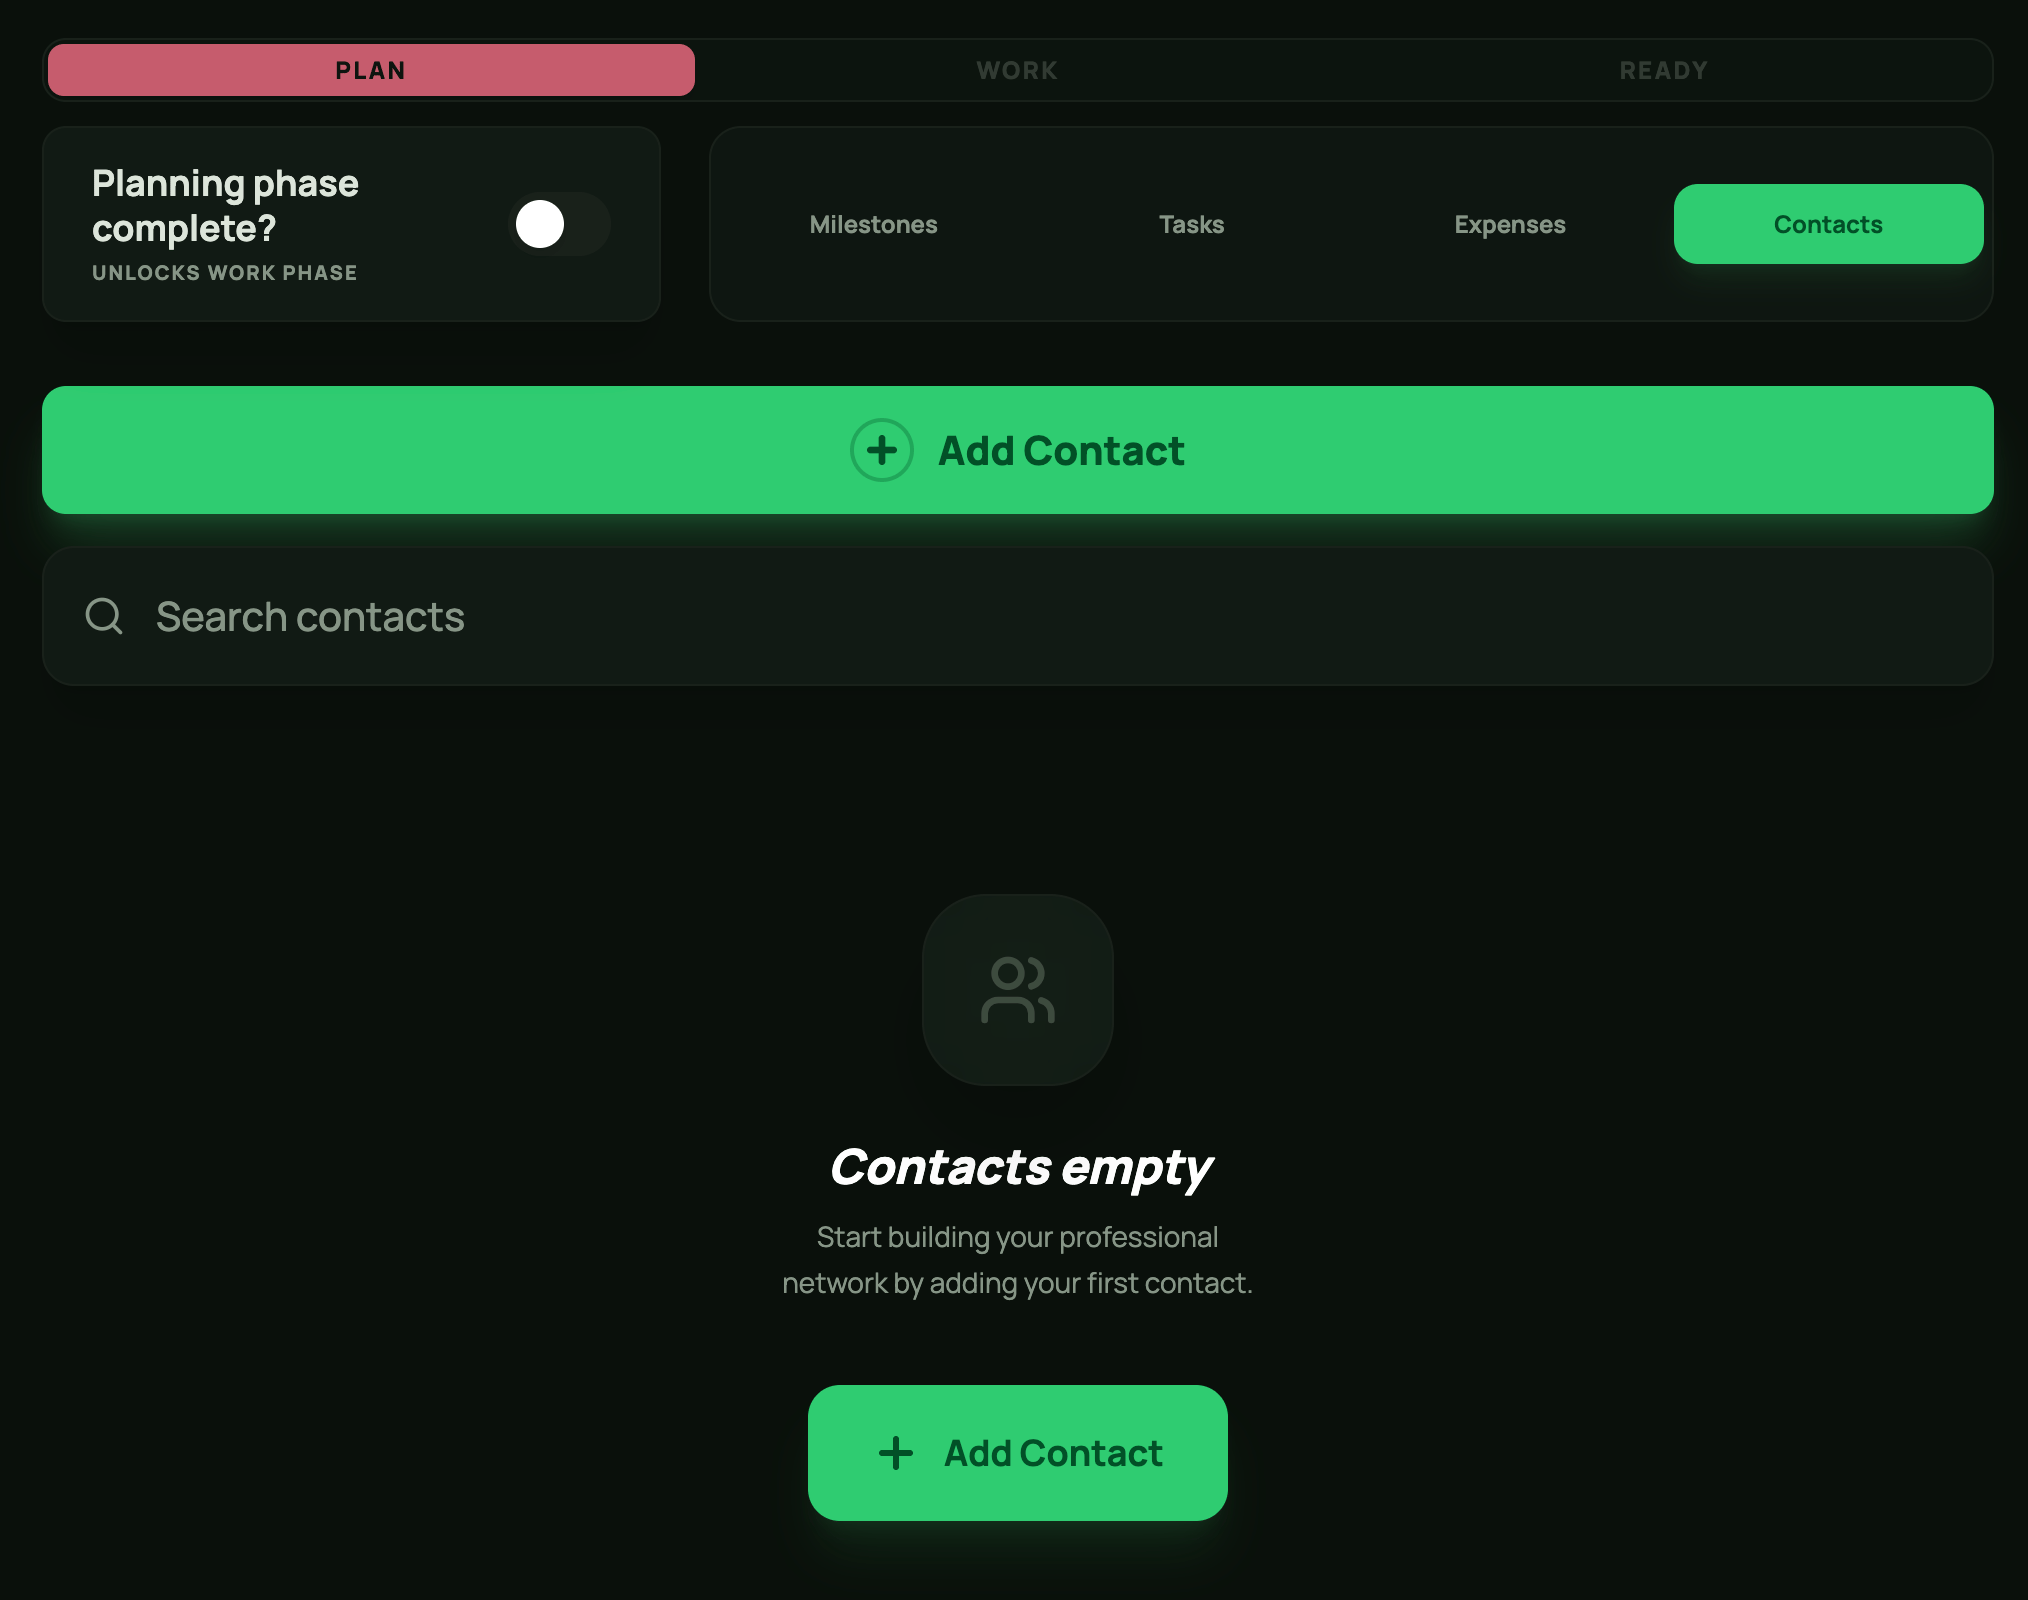
Planning Phase Contacts
Add/Import Contact
Add or import relevant contacts during the PLAN phase by creating new contact items, importing existing contacts from the Contacts page, or syncing contacts from your device’s contacts application.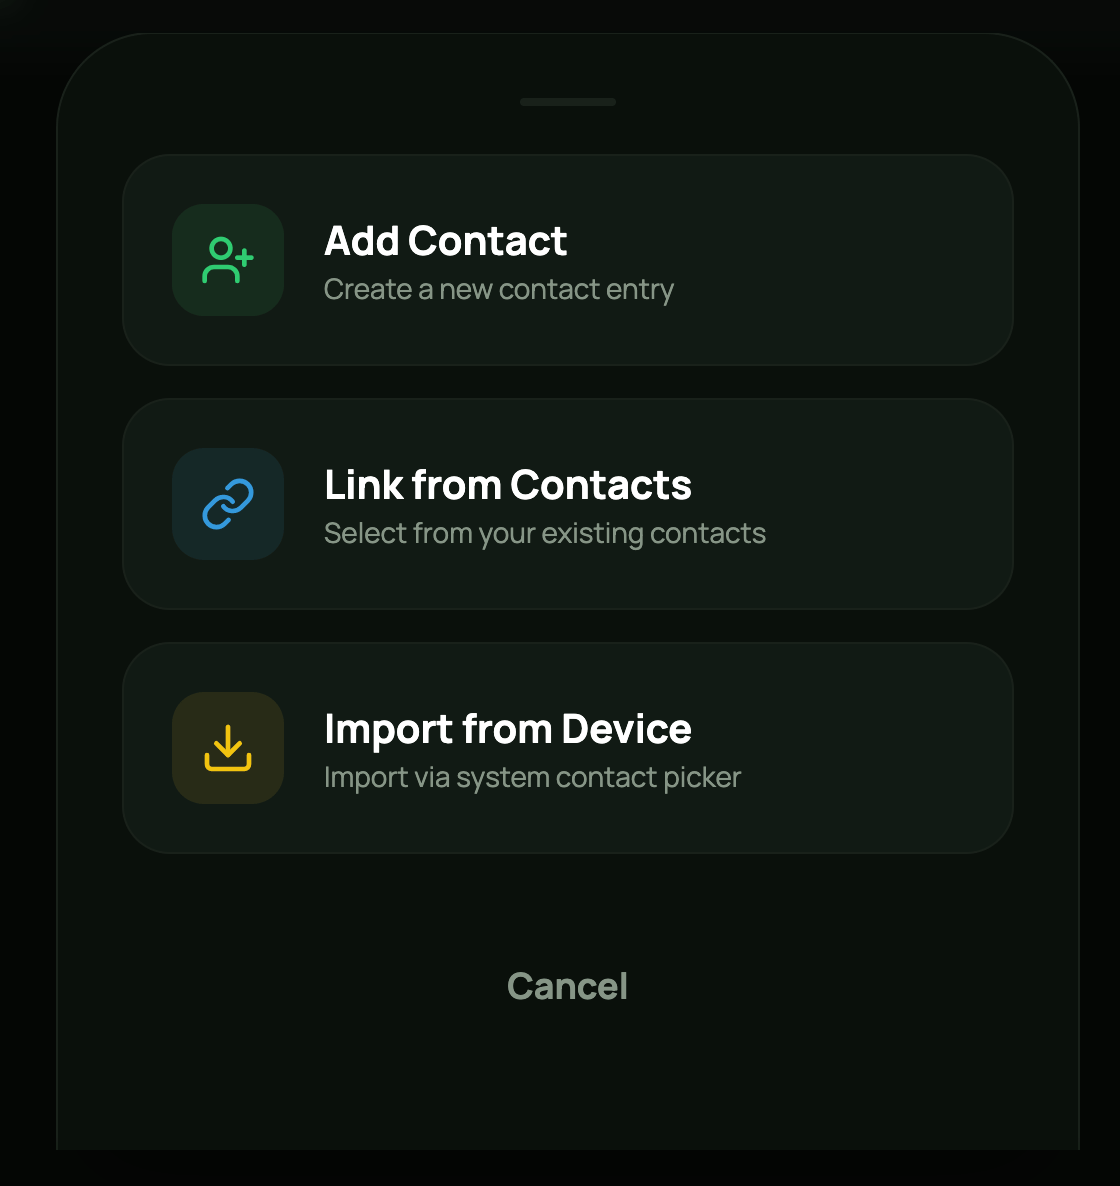
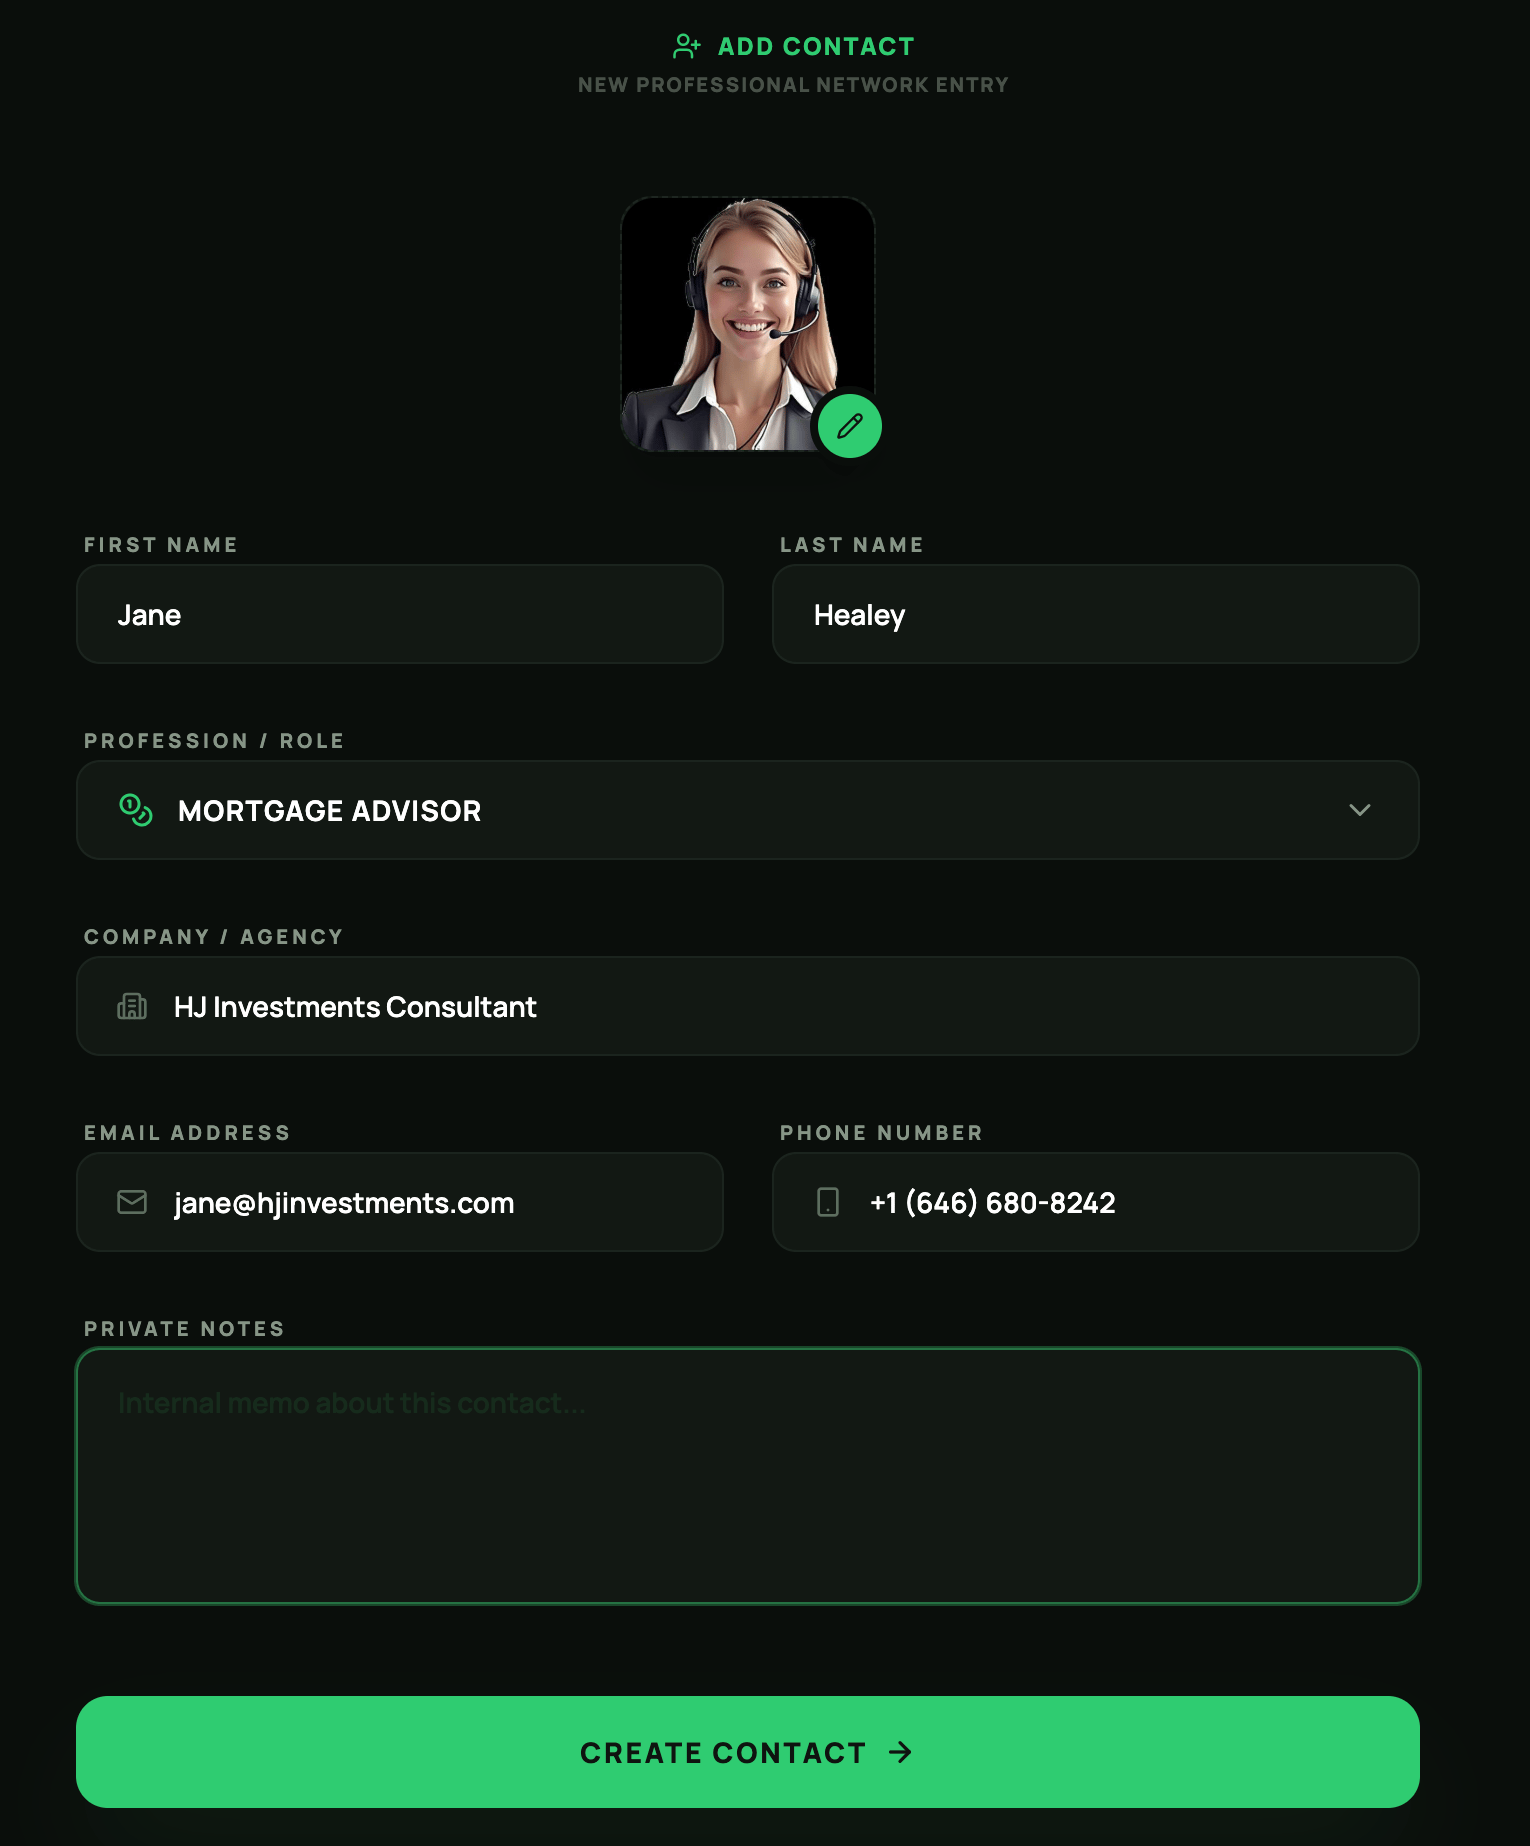
Add Contact
The Contact page contains the following fields:- Profile Image
- First & Last Name*
- Role
- Company
- Email Address*
- Phone Nuber
- Notes
Work Phase
The Work phase helps you organize all milestones, tasks, expenses, and contacts related to the execution stage of your property’s lifecycle. By toggling the “Plan phase complete” button, the property’s status will automatically change to WORK, and you will be redirected to the property’s Work phase page. Alternatively, you can change the property’s status at any time or set WORK as the initial status when creating the property. Since the Work phase includes the same features and workflows described in the PLAN phase section, you can refer to the previous section for detailed information.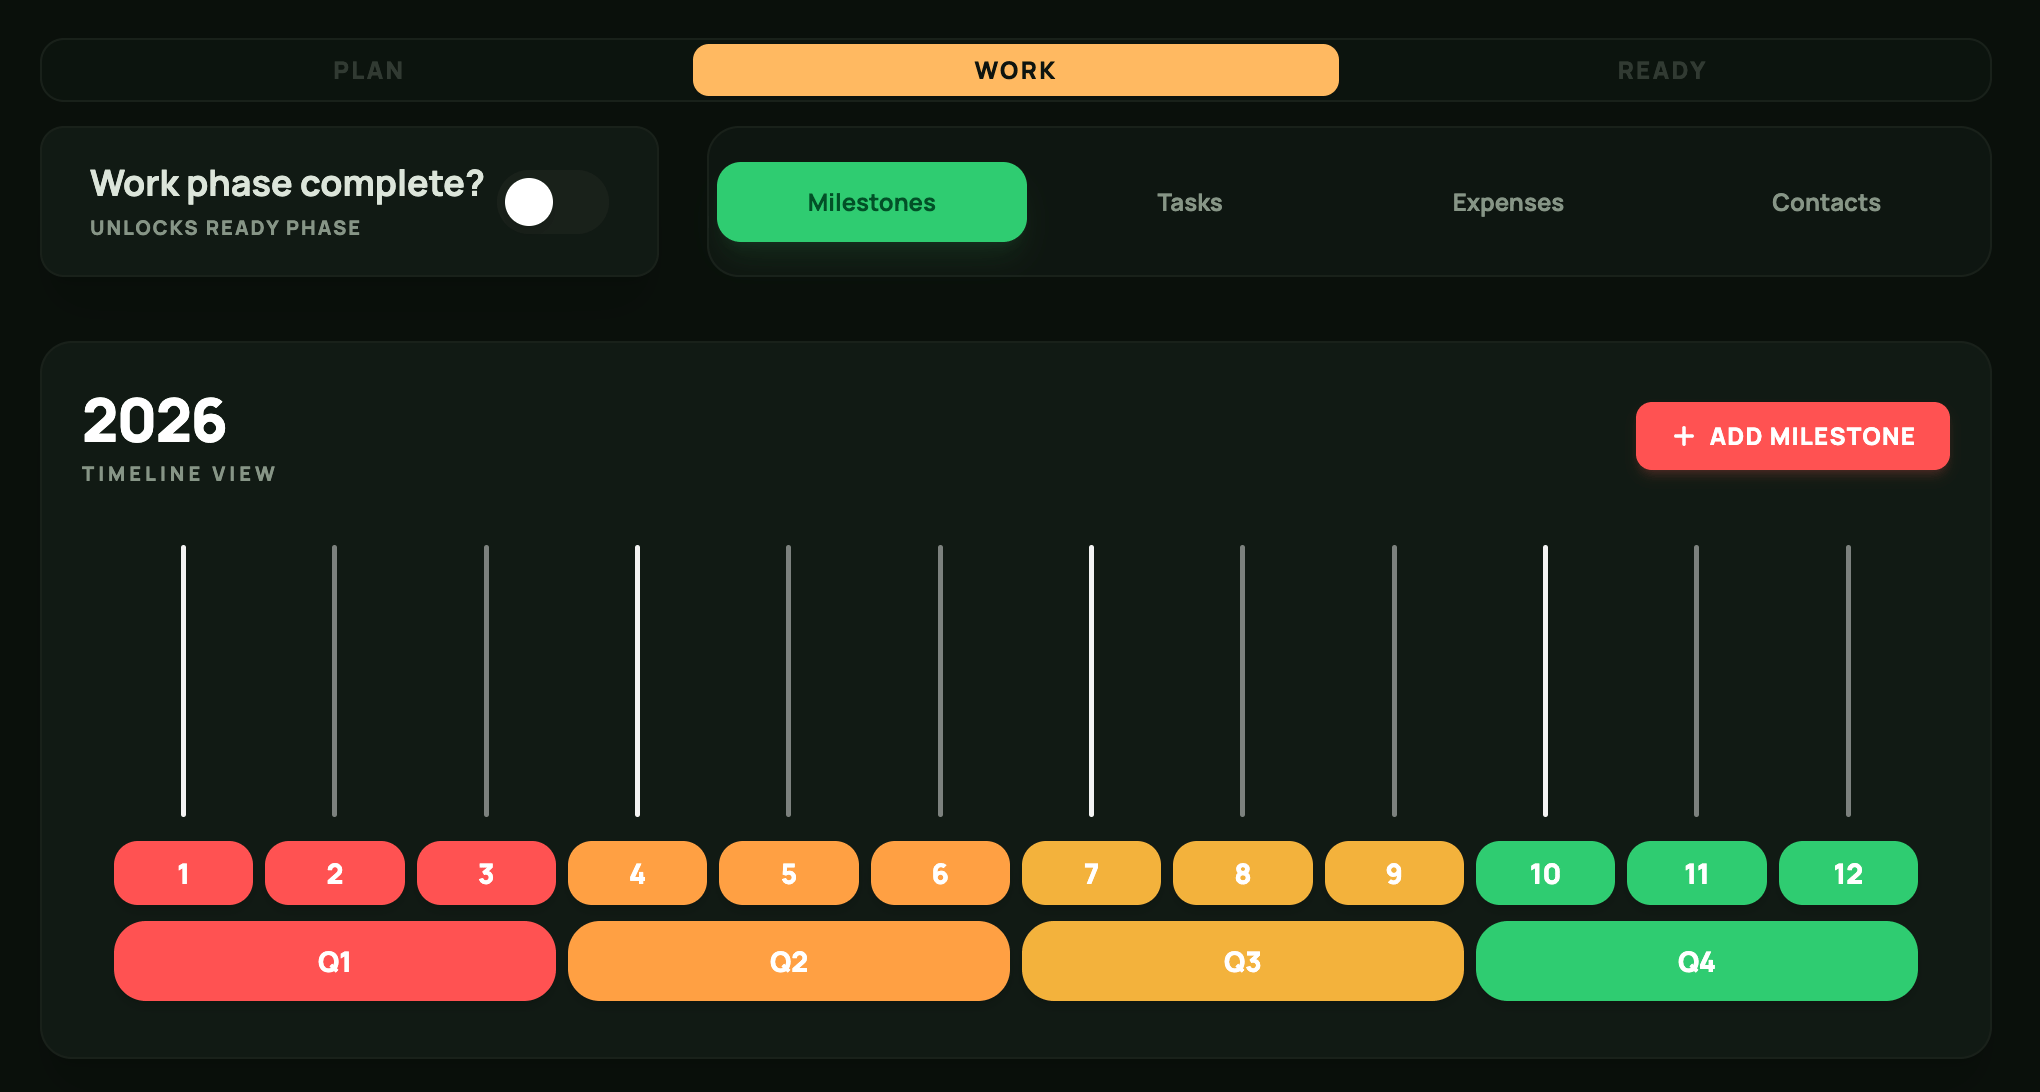
Work Phase
Ready Phase
While the PLAN and WORK phases are temporary stages - or may not be relevant for your specific use case - the READY phase is the long-term management phase for properties intended for rental (short-term or long-term). The READY phase includes some features from the previous phases, along with additional tools and functionalities specifically designed for ongoing property management.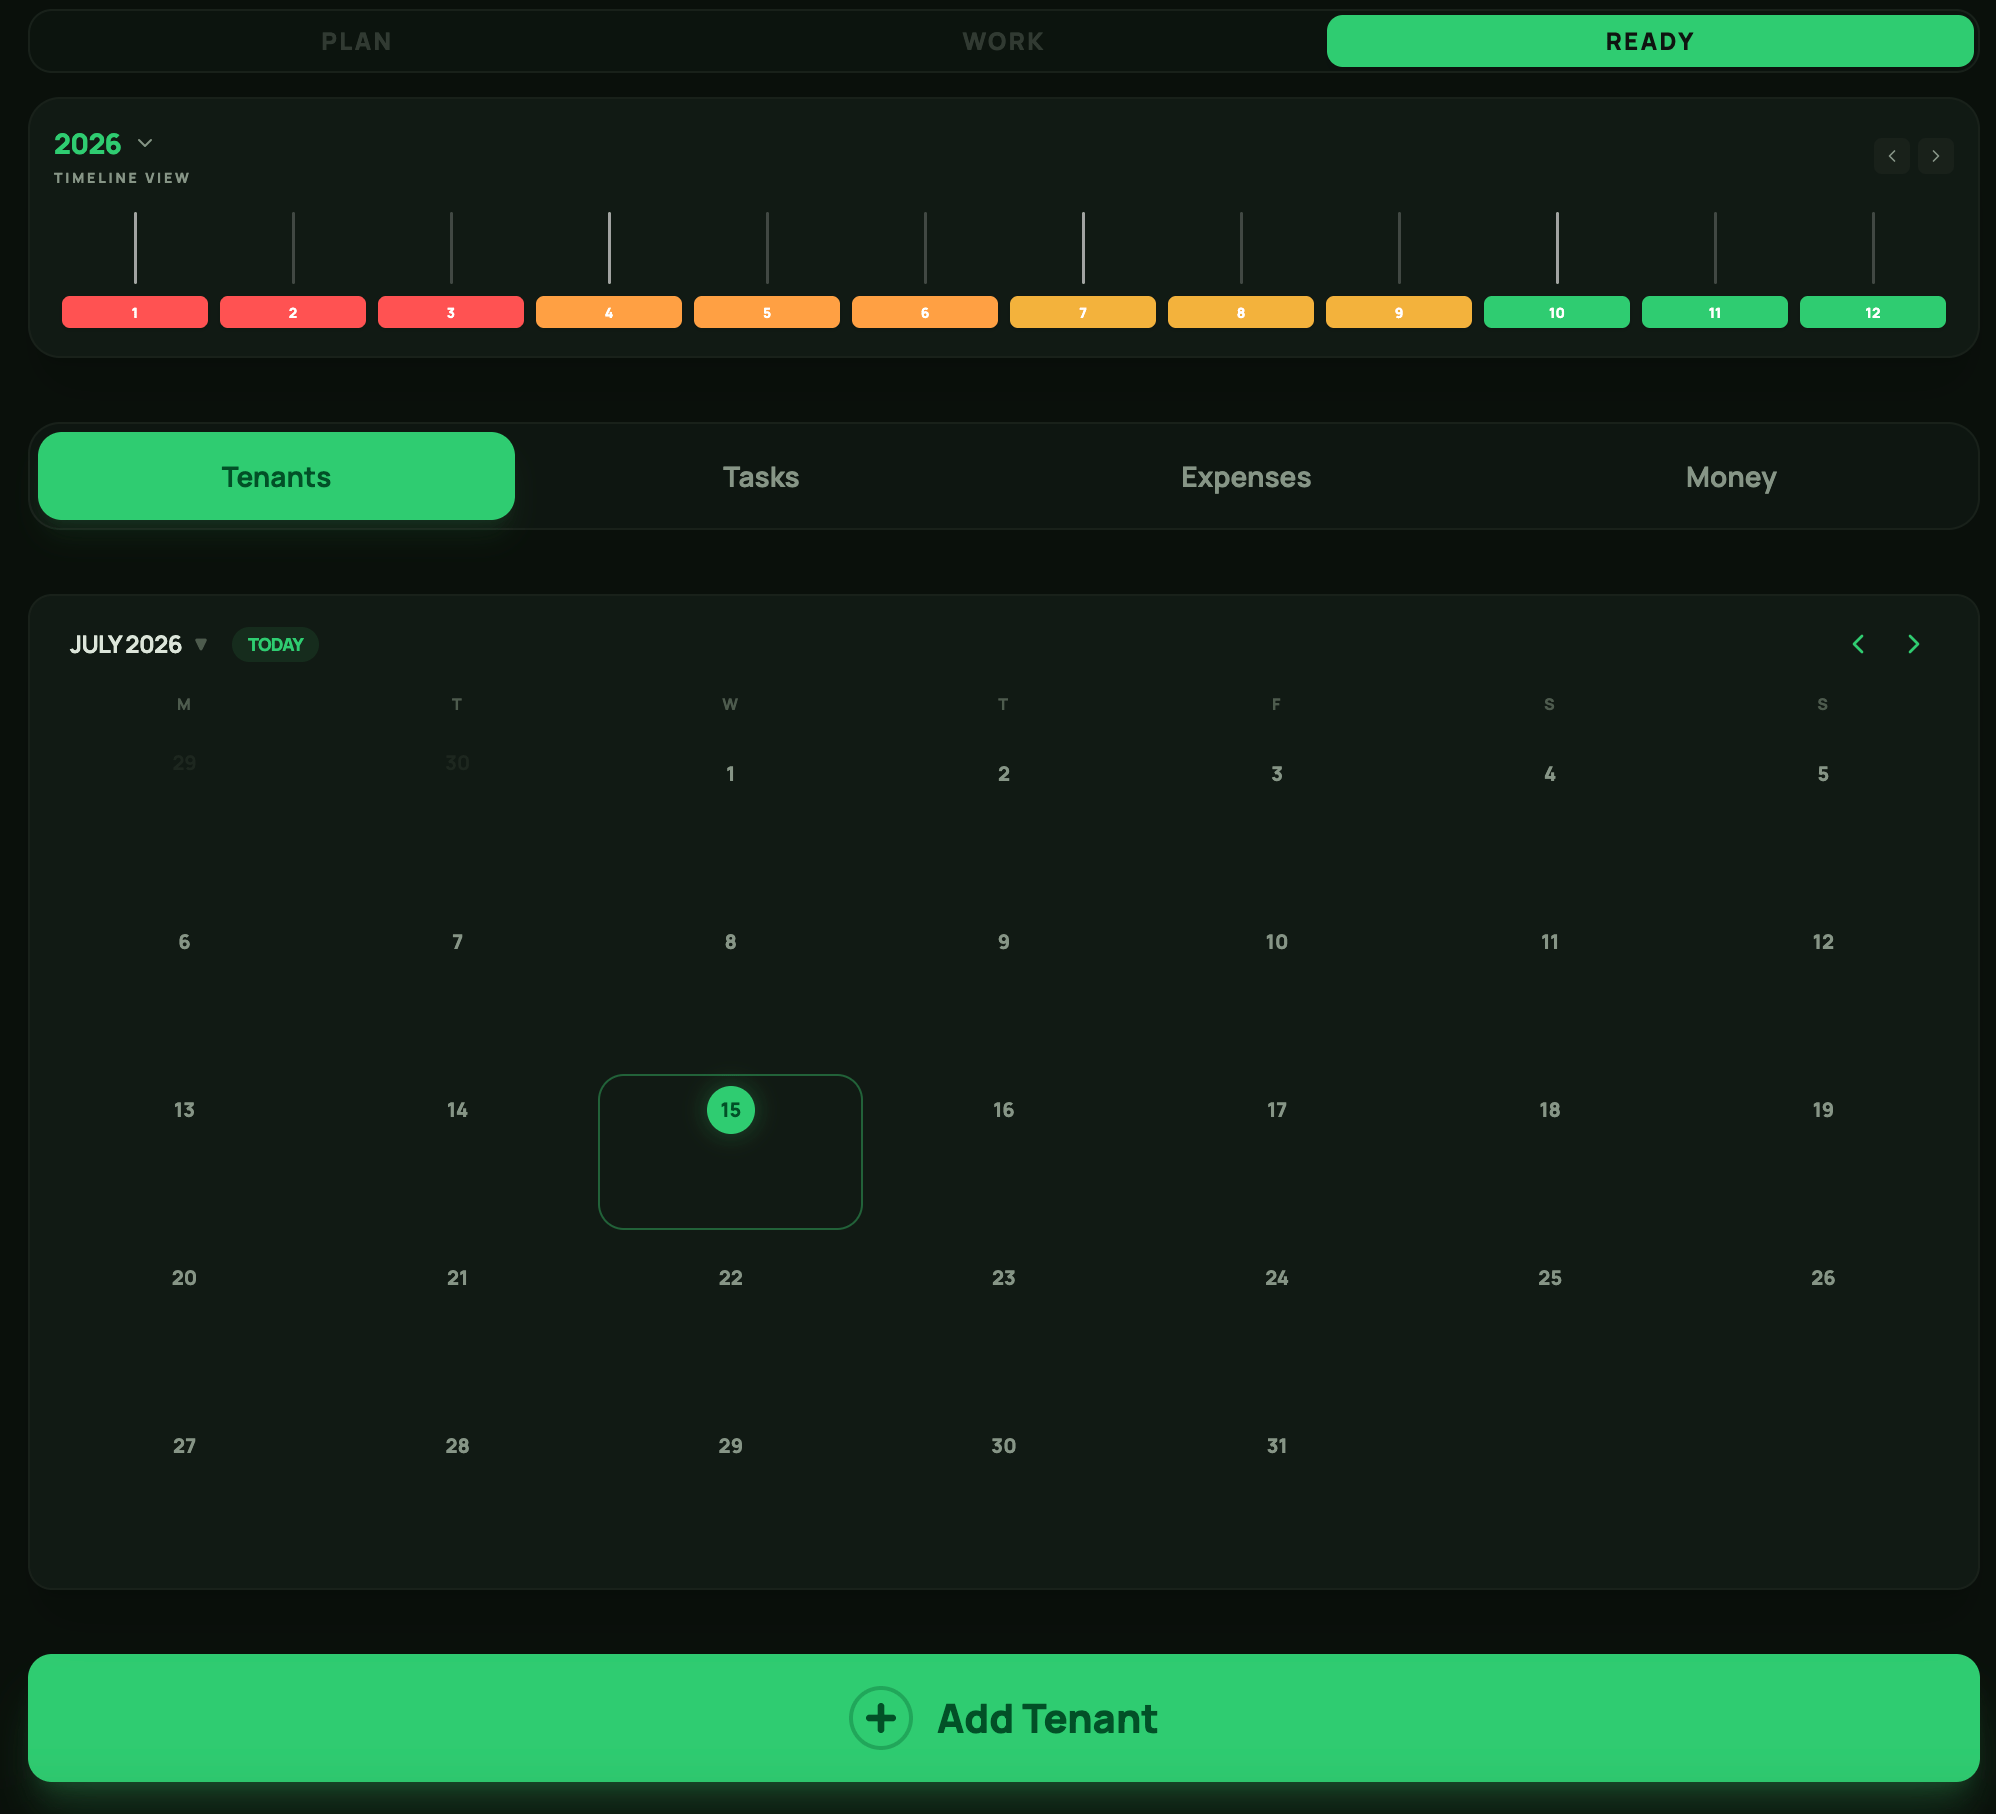
Ready Phase
Timeline View
The Timeline view provides a complete overview of your property’s lifecycle, helping you see the bigger picture at a glance. Every tenant or guest stay, task, and expense will be displayed on the timeline with a dedicated flag. Hovering over a flag will reveal the item’s name and details, while clicking it will take you directly to the relevant item, ensuring you can quickly navigate without losing track.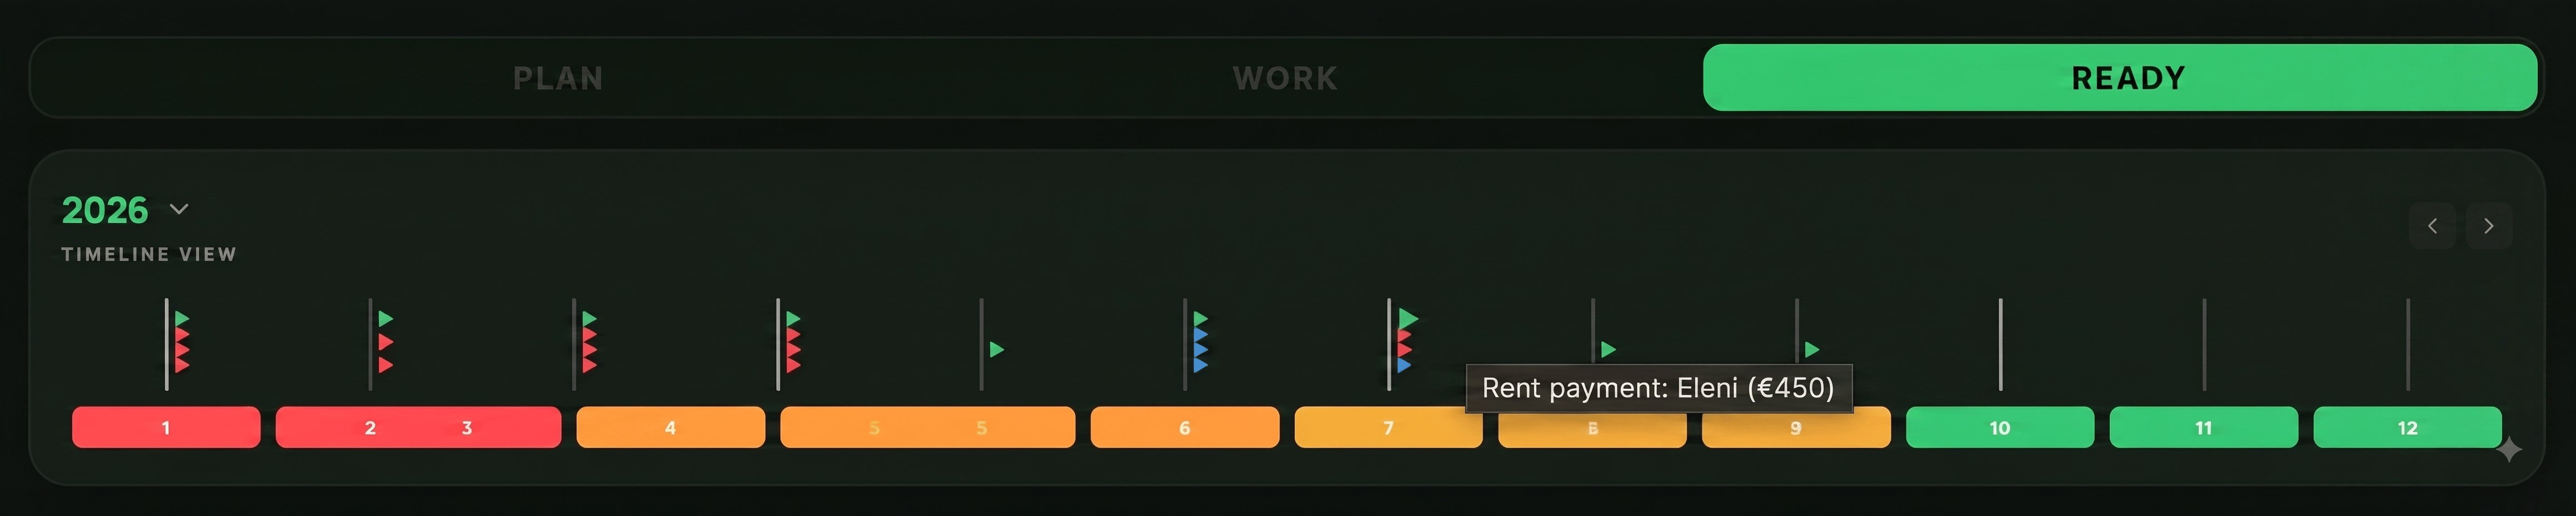
Timeline View
Tenants
Manage your short, mid, and long-term tenants or guests with our complete suite of 360° tools.Connect PropertyGenius with your external platforms and keep all your property management activities organized in one place.
Tenants Calendar
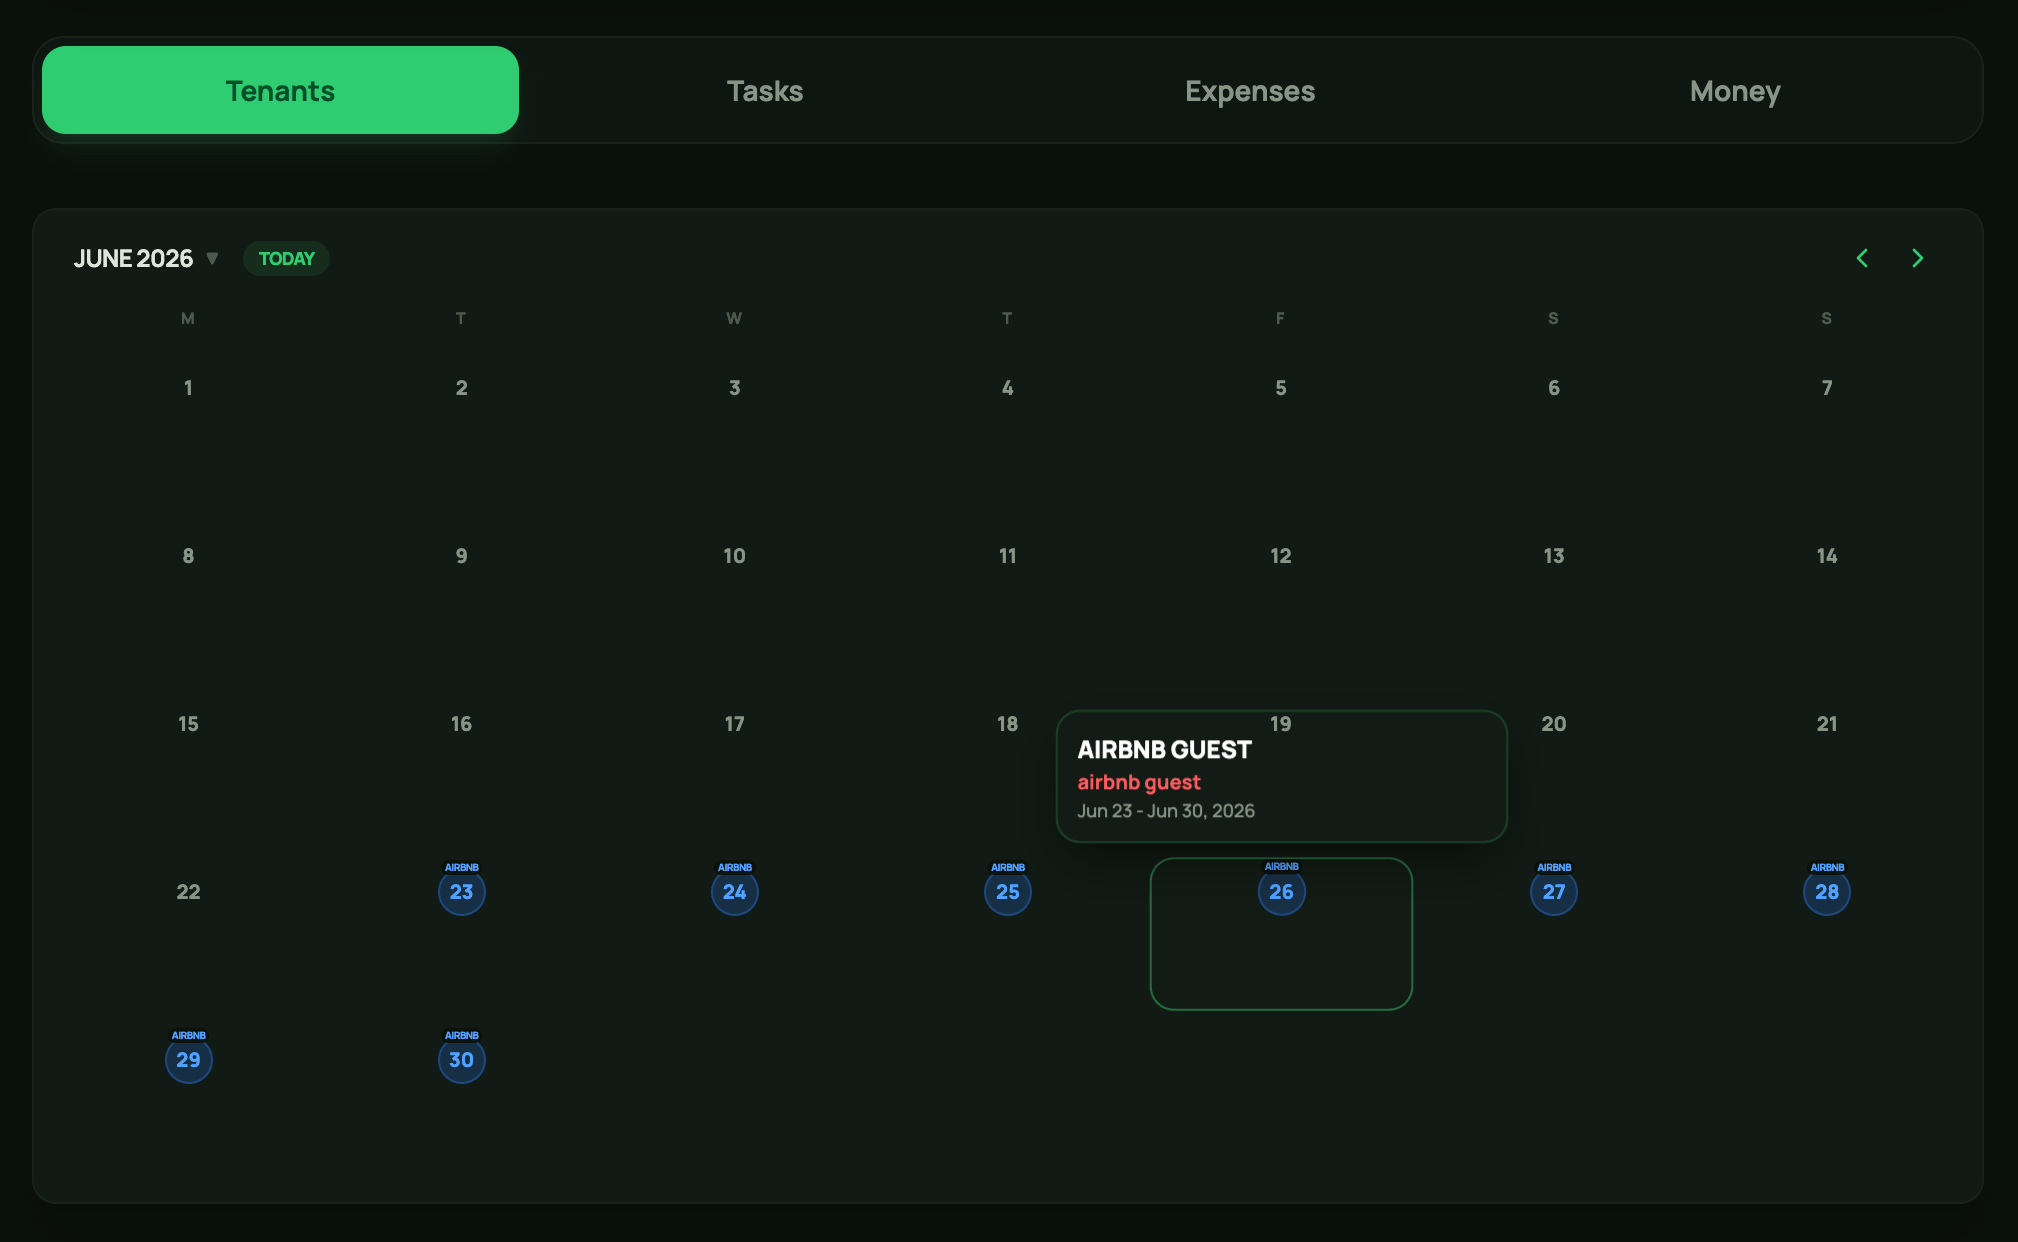
Tenants Calendar
Add Tenant
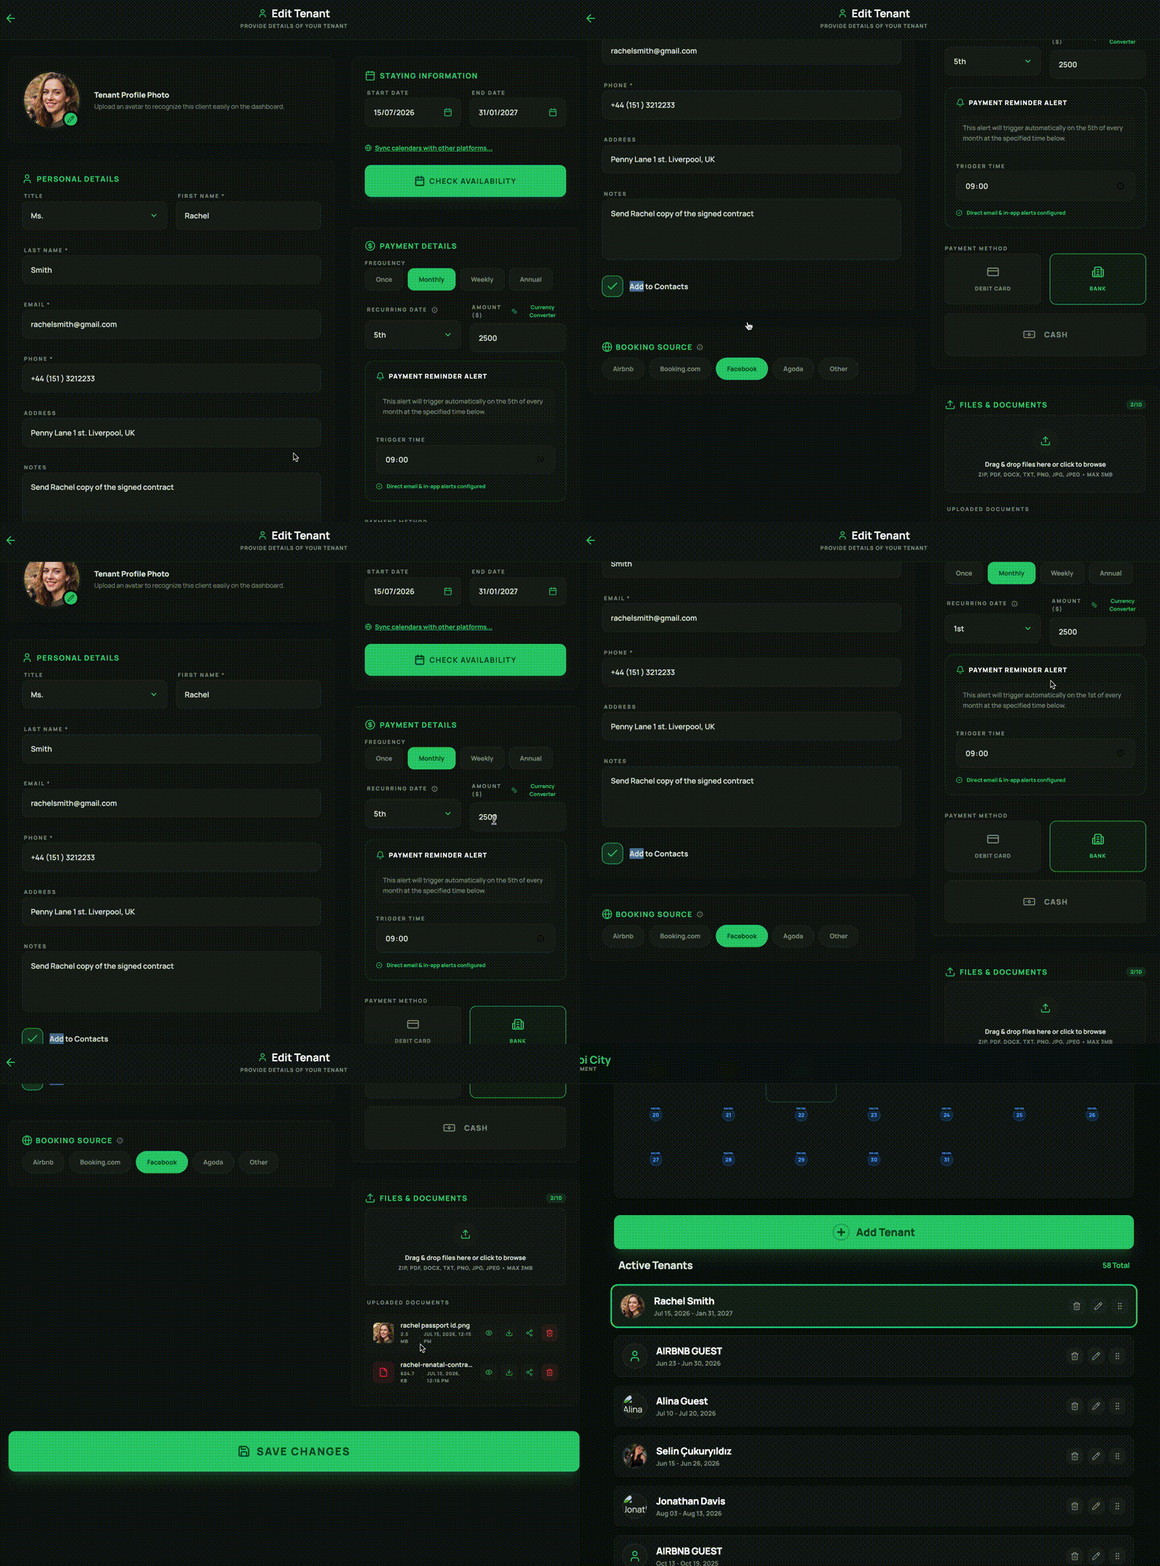
The Add/Edit Tenant page allows you to create and manage tenants associated with your property. Each Tenant item includes the following fields and capabilities:Personal Details:
- Profile Image
- Title, First and Last Name*
- Email*
- Phone*
- Address
- Notes
- Add the Contacts
- Airbnb
- Booking.com
- Agoda
- Other
- Start & End Date*
- Sync with External Calendars – Connect your property with external platforms such as Airbnb, Booking.com, and Agoda to keep calendars synchronized.
- Check Availability – Verify that the selected stay period is available by checking against your application’s calendar and any connected external calendars.
- Frequency
- Recurring Date
- Amount
- Currency Converter
- Payment Reminder Alert
- Payment Method
*Mandatory fields
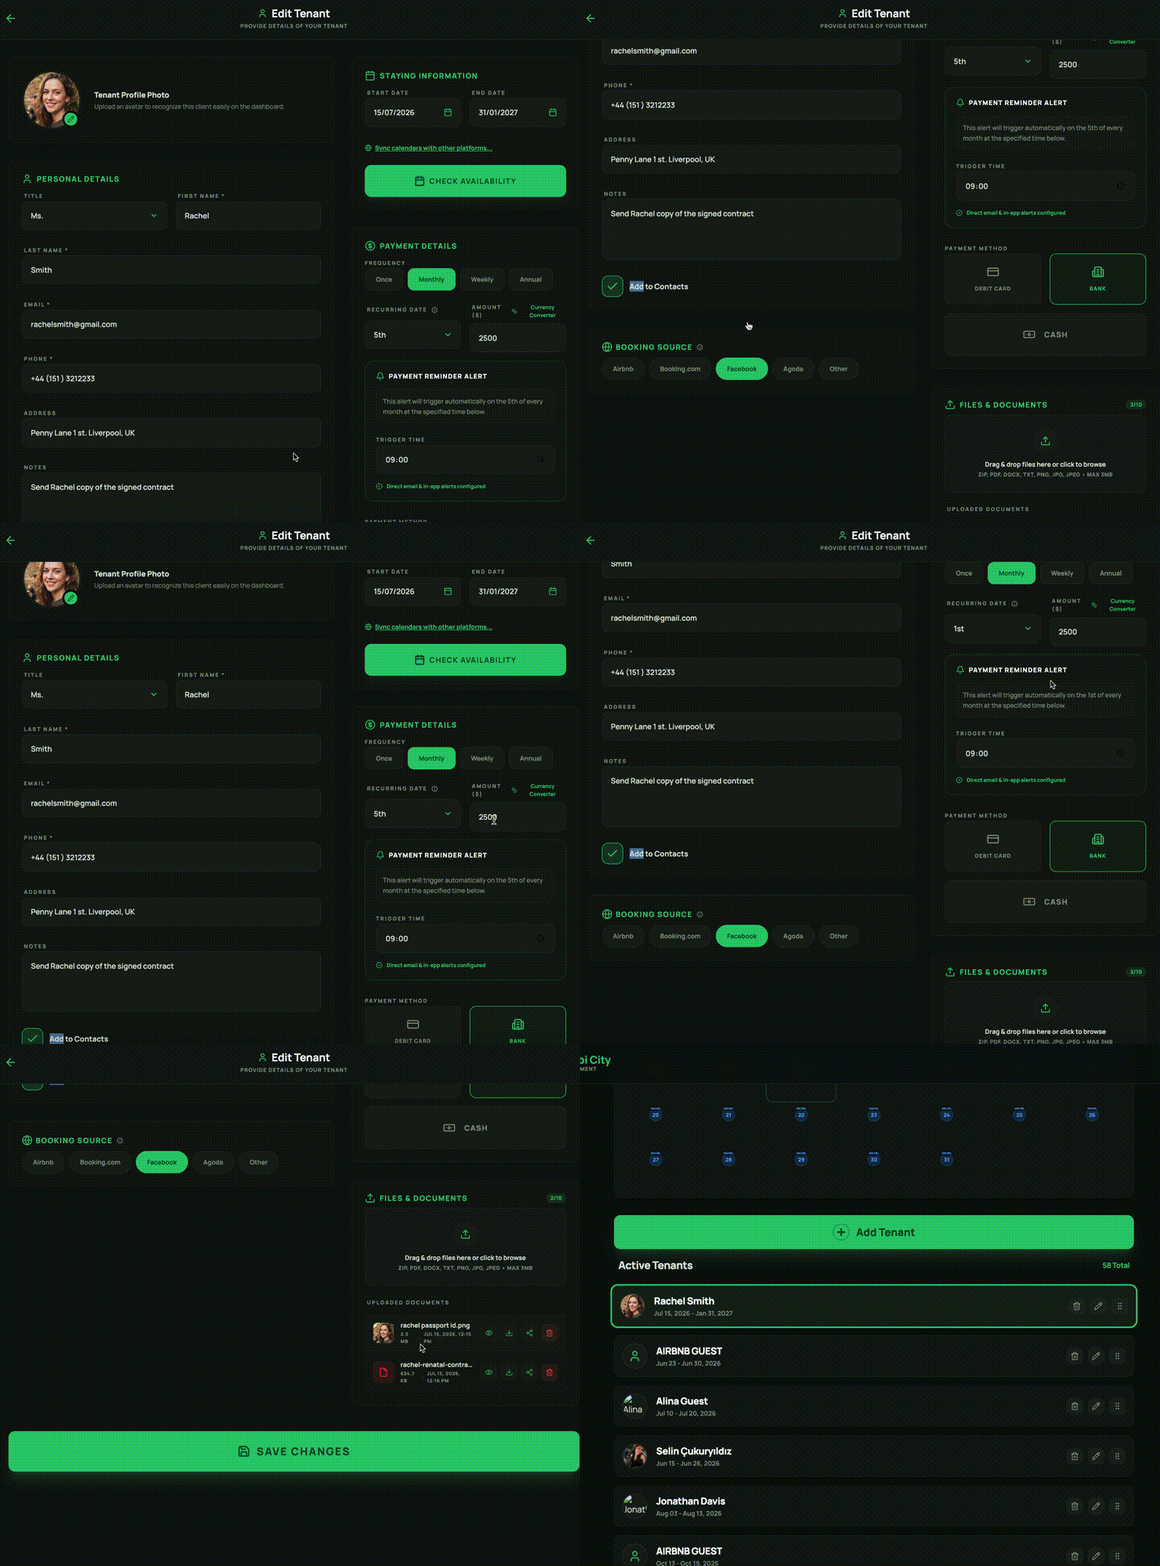
Add Tenant
Tasks
See Tasks in the PLAN phase.Expenses
See Expenses in the PLAN phaseMoney
The Money tab, summarize each property payouts and expenses and provide financial insights to help you grow your property’s revenu.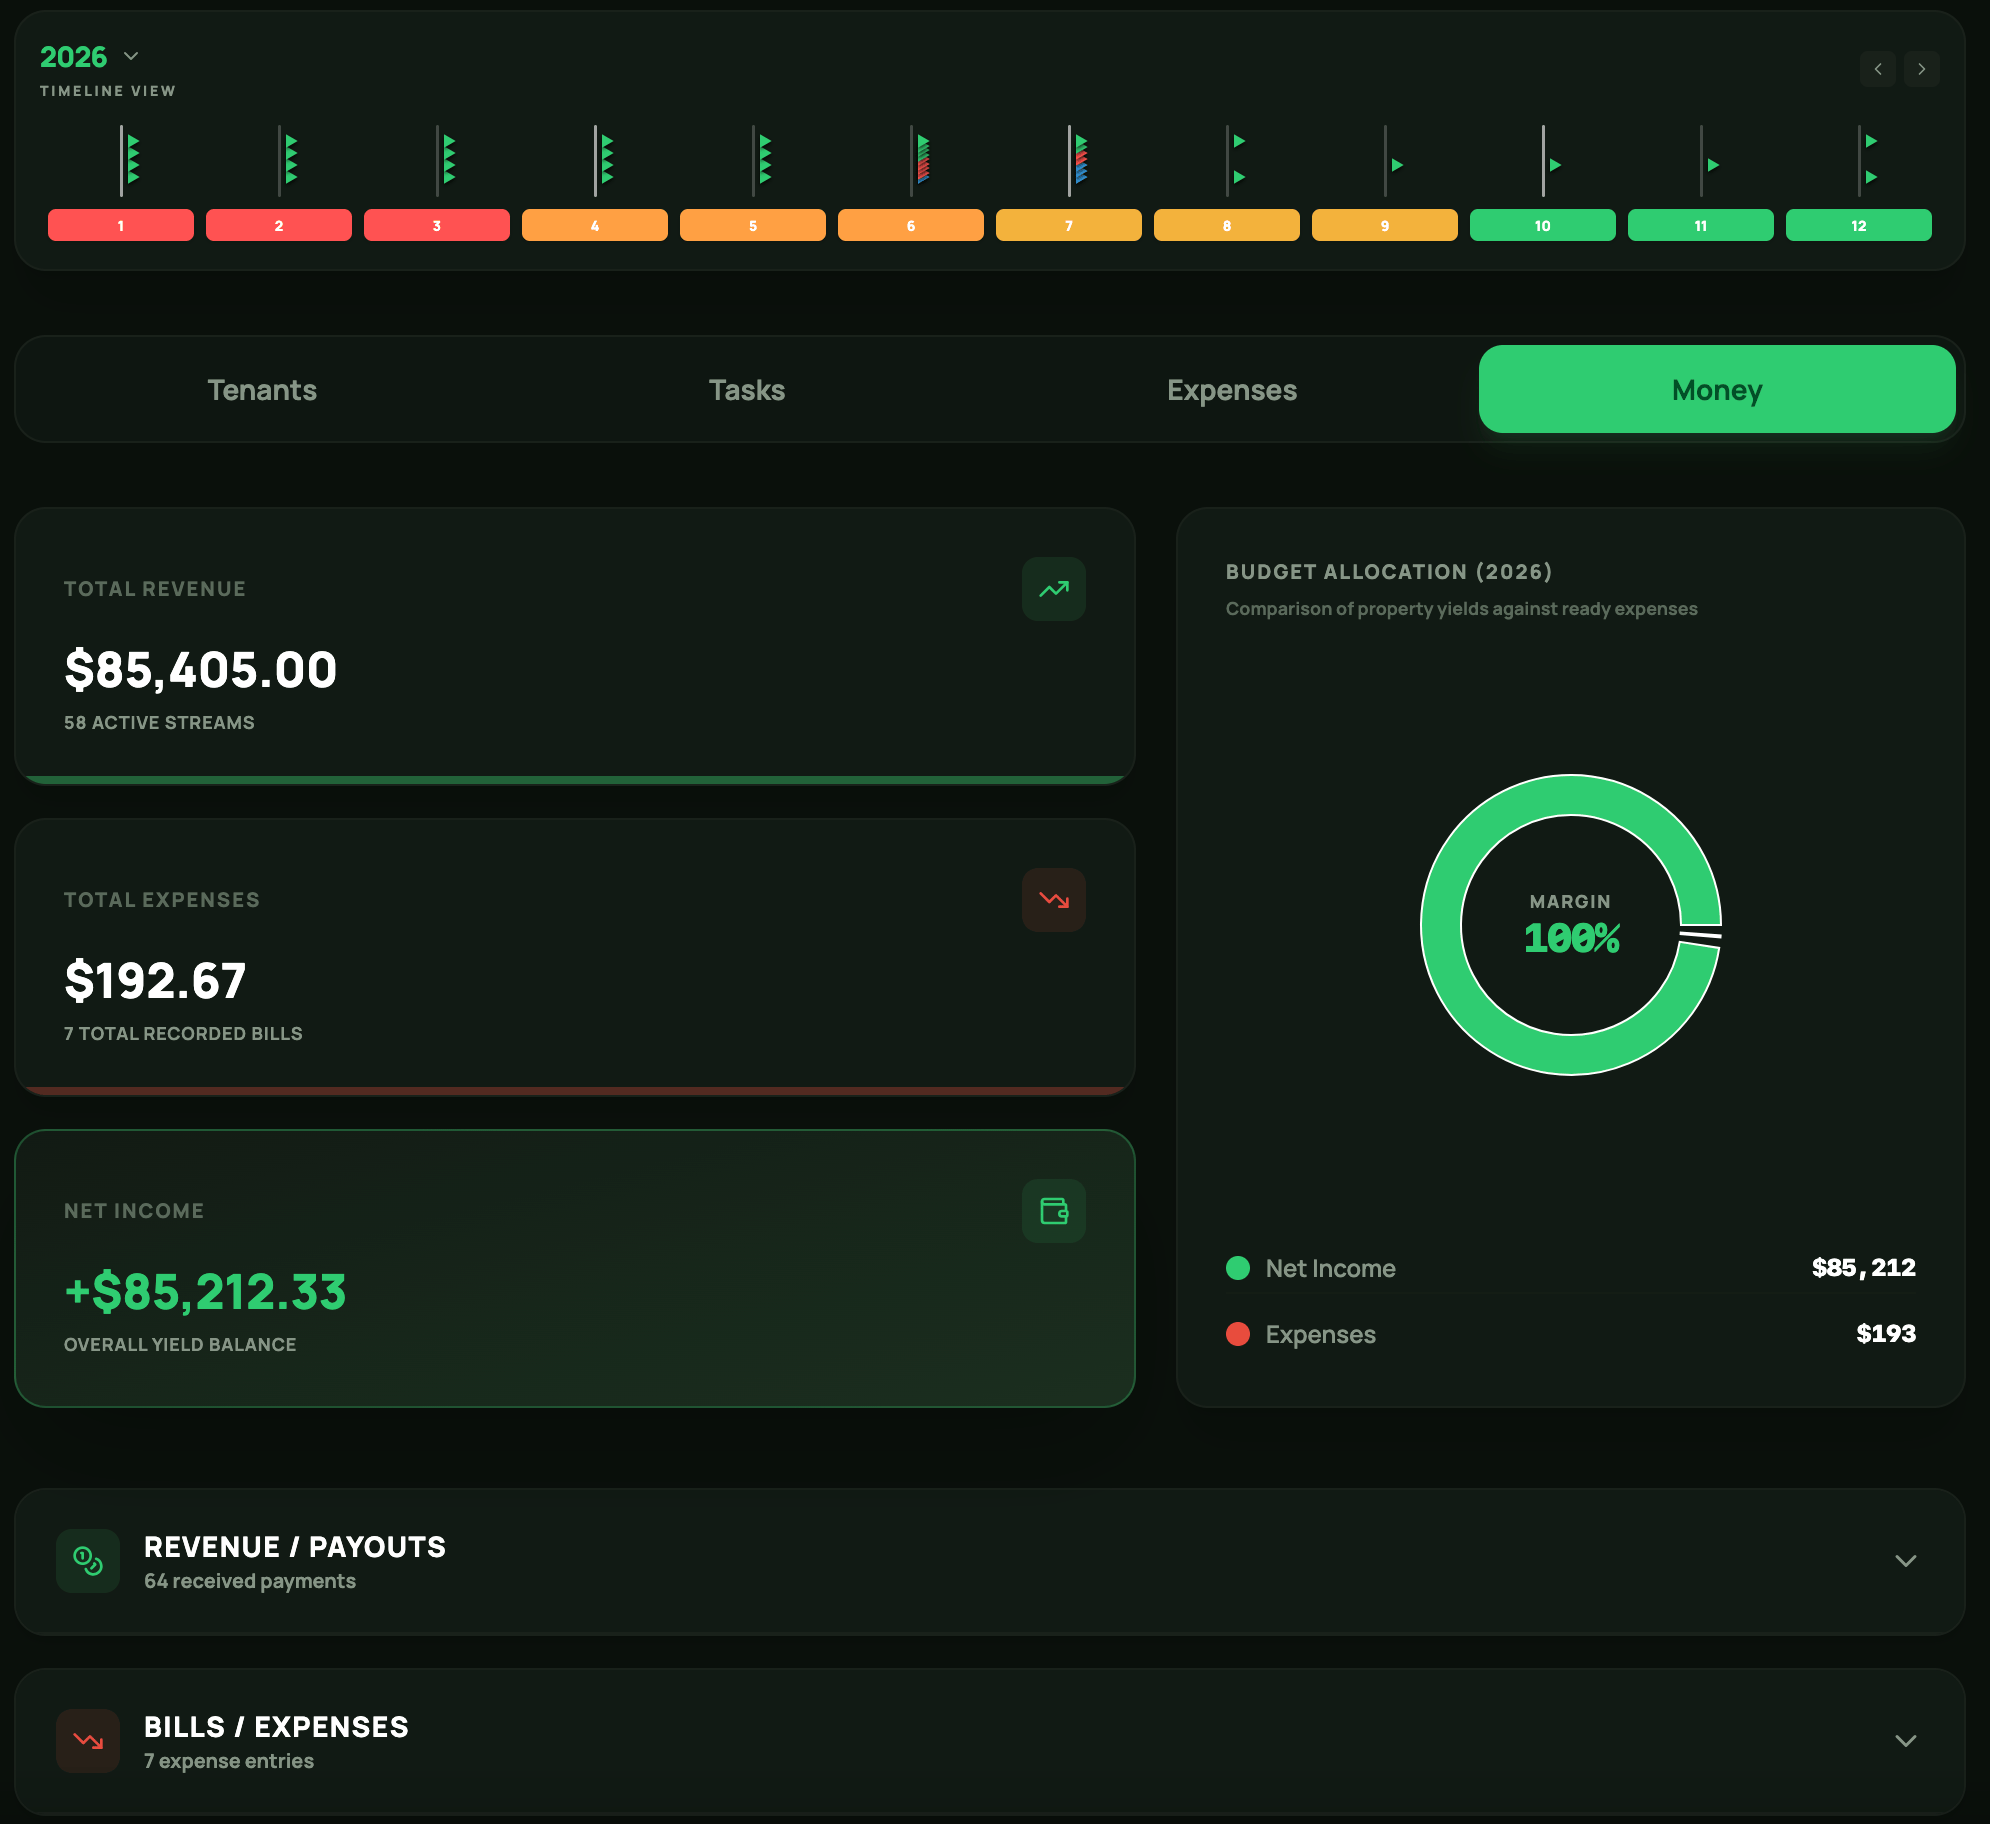
Money Stats